
"Is it your reputation that is bothering you? But look at how soon we're all forgotten.
The abyss of time swallows it all.
The emptiness of those applauding hands.
The people who praise us; how capricious they are, how arbitrary.
The $250 Husky Air Compressor Model VH631400AJ is finally up and running. It has been a fun - if lengthy - process to get it going. I bought it in late November of last year, and got it together just today. The guy that sold it to me was a knucklehead, but I had no idea how much of a knucklehead he was - until just now.And the tiny region it takes place. The whole earth in space - and most of it uninhabited." - Marcus Aurelius
Today's project began with installing the reed valve plates and cylinder heads. I got about half way through this part of the project before realizing this would require a quick trip to the hardware store. Apparently the previous owner had removed one of the cylinder heads and lost three of the lock-washers. You have compression, heating, expansion, and vibration happening all at once on the cylinder head, so everything has to be snug. Of all the places on the compressor that need lock washers, this is probably the most important.
Below: Assembling and stacking the plates, reed valves and gaskets per the instructions. You use a little dab of grease to keep the reed valves (rectangles) in place as you stack the plates. Once stacked, one reed faces up, and the other one faces down.


Note on the above photo - right side. The old gasket was fried onto the cylinder head, and very hard. I scraped it off as
best I could, then lapped the cylinder head on a flat surface with fine
sandpaper. You have to be very careful when scraping gaskets from aluminum - it's easy to gouge into the soft aluminum and ruin the seating surface - then you have to replace it. I didn't want to get too aggressive, so the lapping worked out pretty well to remove the remnants of the gasket.
Below: A view from the step ladder, looking down on the compressor. The cylinder head has been reinstalled, with the valve plates and reeds stacked up under it. New lock-washers too! The discharge pipe is fitted up, but not tightened, because I'll be removing the other cylinder head as well.

When I found the junk in the first cylinder back in December, I decided it would be a good idea to also inspect and replace the reed valves on the other cylinder. Below are the as-found pictures. It was not as bad as the cylinder that had been operated without an air filter, but it definitely was time to replace the reed valves and clean it up.
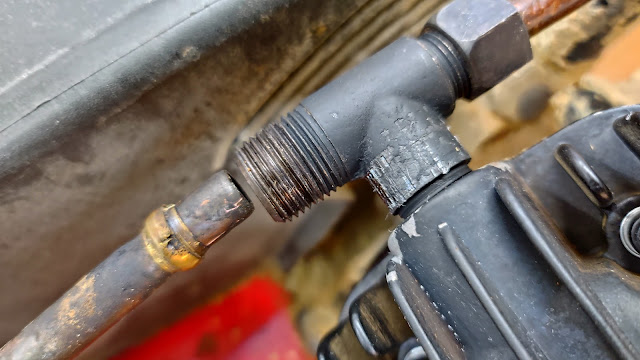
Take a look at the mouth of the copper tube at the top left in the picture below. Someone had taken this fitting apart, and while re-assembling it - it's a tight fit - rolled the bottom of the copper flange over. I had to heat it with a torch, and work the copper flange outwards, hoping that the compression flange would seal again. Fortunately it did seal. Afterwards, I cleaned off the top of the piston, nice and shiny, and removed the old gasket.

Below: The other cylinder head and valve plates - from the cylinder that had a working air filter. A bit worn, but not filled with sawdust. Replacement lock washers and flat washers are at the bottom of the photo.

Below: Damage from the previous owner. Plier marks on the Tee fitting, and a damaged brass ferule fitting on the copper discharge pipe. I filed the burr down and hoped that the fitting would hold air pressure once I got it together. Fortunately, this fitting held as well. I need to do the soapy water test on every joint, but I can't hear any gross air leaks, so that's a good sign.
Some other modifications: Below - the crankcase drain plug is at the bottom. When the oil plug is removed, oil will run all over the tank when you drain the oil to service the compressor.


I installed a second drain extender underneath the air receiver tank, and I'll be making further modifications, so that it's not necessary to get down on the floor to drain moisture out.
Speaking of moisture, it's a big deal in air compressors. Air contains 1-3 percent water vapor, as humidity. When you compress hundreds of cubic feet of air, you also add a couple of cups of water to the tank, which must be drained.
Once I got underneath the tank, I found that the drain valve was stuck shut - of course it was! I replaced it with the second extension hose.
Below: Original drain valve at the bottom and extension hose above.

At this point, I figured I better put the borescope into the tank and see how bad it was messed up. There was rust inside, due to lack of drainage. After seeing all the mickey mouse work, I expected this.

I installed a valve on the tank outlet, and plugged it in to the 230 volt outlet. Then I stood way back as it filled with air. There was no way to know if the tank would fail as it filled up to operating pressure - due to the internal corrosion. I opened the big door on the shop, just in case. I didn't want the windows to blow out if the tank split open.

The compressor runs smoothly and is very quiet compared to the buzzy Harbor Freight portable compressor. The tank fills up from zero to full pressure in about 3 minutes - It's really quick. The little compressor takes about 10 minutes. The auto shut-off worked correctly at about 120 psi - so it looks like we have a well-functioning compressor.
Below: The little compressor that this big fella is going to replace.

After the tank came up to pressure, I spent a lot of time blowing the exterior down with air. The motor was full of sawdust, as was the belt drive housing. Then I ran it and blew air as it ran. Even more sawdust came out.
After the tank filled with air, I tested out the new drain line. It did not release any air or water. The bottom of the tank was full of gunk, and the drain line was plugged. I had to vent all the air, then remove the hose that I'd installed. After removing the hose, I poked some bailing wire up into the hole, until water started draining out. It kept draining and draining, all over the floor of the shop. There was about a gallon of water that had been sitting inside the tank all this time, corroding the steel :(
I have an auto-drain valve on the bench. It has timers to adjust drain time and the span between draining. The compressor won't run very often, so I'll probably set it for the shortest duration on the drain time and the longest span. Just need to gather some fittings to connect it up to the hose, and figure out where to route the water drain. The hose is 1/4" and the valve is 1/2"

The next step will be to prepare the little room in the shop. It needs taped, mud and paint, and then a door. The compressor isn't all that noisy, but it's noisy enough that I don't want to be in the same room with it.
Quick update: Crankcase drain line is capped and secured - zip tie, but it's not flopping around.

Update 10 February 2022.
I was not thrilled with the quantity of rust boogers that were plugging the air tank drain, and I was also pretty sure that I didn't get all of them out of the tank. A friend recommended putting a 2 liter bottle of RC cola inside, because it contains the most phosphoric acid of any commercial soft drink...
The phosphoric acid would chew on the rust, and help wash out the rust particles. So I did that. And rinsed the tank several times after allowing the acid to soak inside for a couple of hours. I sloshed the compressor around quite a bit on its base during each rinse. The particles in the bottom of the deep sink all came out of the compressor. These would surely have gunked up the auto drain valve.


A series of posts about preparing a dedicated room for this beast begins here.
No comments:
Post a Comment