
I did a bit of research on the OEM Ford automatic locking hubs, and learned that they don't engage and disengage reliably. I can already tell that neither front hub is engaging, because I can't get either front tire to spin in the snow. It probably doesn't help that no maintenance has been done on the front end since I've owned the truck - about 20 years now.
Most people who seriously need the 4x4 capability of their truck have ditched the OEM hubs and installed aftermarket hubs by Mile Marker or Warn. The Warn is more expensive, but I chose that brand because I'm familiar with the brand, and it has an excellent reputation in extreme service.
My truck is used to clear snow on our property, so I legit need the 4x4 capability to work consistently. My boss will be livid if I tell him I'm missing work due to snow on the driveway. I'm not sure how many people "need" their 4x4 ability, but keeping my job depends on it, so the OEM hubs absolutely have to go. Click any image to enlarge.

I did most of my research and all of the purchasing online, and I didn't have the truck handy while I was doing the research. I wasn't sure what model the front axle was, and it's important to know which axle your truck is equipped with. The parts and tools you will need to make the conversion will be slightly different, depending on which axle your truck is equipped with.
Apparently the 1995-1997 F-250 trucks came with a couple of different front axles, depending on cab configuration and engine size. One guy in an online forum stated flatly that all F-250 trucks sold with the Powerstroke engine came with the Dana 50 axle. Eventually I was able to get under the truck and take a look. I circled what I found (not my truck or photo, but you get the idea):

Looks like a Dana 50 axle to me...
Next I watched several Youtube videos on how to make the swap. I felt that none of them really were 100% of what I would like to see, but they gave me enough information and confidence that I felt I could handle the task.
The guy below had one of the better videos, although he didn't provide part numbers.
While apart, I will also re-pack the wheel bearings, check the bearing seals and replace if necessary, and replace the front brake pads. The truck pulls hard to the left when the brakes are applied, and I need to investigate that issue while I have it up on jack stands.
With the axle information, I ordered the special tools and parts that I would need for the conversion. This is what is needed for the job on a Dana 50 axle:
- Powerbuilt 2-3/4 thin-wall socket PN 647068 - This is used only to remove the OEM Ford spindle nut, which will not be replaced.
- Napa Service Tool 3246, to install the new spindle nuts
- Warn Spindle nut kit 32721
- Timken wheel bearing grease - for repacking the wheel bearings with new grease.
- Warn Manual Locking hubs 38826
You can do this job with the truck on the ground, and the wheels supporting the weight of the truck as you remove the bearing nut. I don't recommend it, but I've seen it done in a video. I'm actually removing and re-packing the bearings, so I'm jacking the truck up.
Update: The job is done, and it was successful.
I'm not into making and editing videos, so I didn't do that. Besides, there are plenty of those available on YouTube. Below are photos of the entire process. It turns out I had ordered the wrong parts (hubs, spindle nut kit, and spindle nut tool), and had to make an emergency run to Napa to get the correct ones. I think the ones I bought online were for a smaller Dana 44 axle. To be perfectly clear, the parts in the list above are what is needed for the Dana 50 axle. I corrected the part numbers on this blog post after finding my original parts did not fit.
So to continue the update, some pictures and description of what is going on...
In the beginning, there was a new truck with OK-looking hubcaps. The plastic tabs on the hubcaps would break off, and the hubcap would be gone. They were expensive to replace. After replacing a couple of them, I stopped bothering. Instead I went with the stamped steel OEM look. The price for this stylish mod was perfect!

Jacked up the truck and removed the wheel.

After you remove the three torx #25 screws and the "4x4" cap, this is what you see, the Ford Automatic hub - which most people don't find to be working very well.

The hub is held in place by an out of focus snap ring, which can be pried out easily with a pick or a small screwdriver. In this pic the snap ring has been pulled out of the groove, but is still gripping the auto locking hub. Sorry, didn't catch that the pic was out of focus before moving on with the job.

Side view of the removed hub.

Rear view of the removed hub

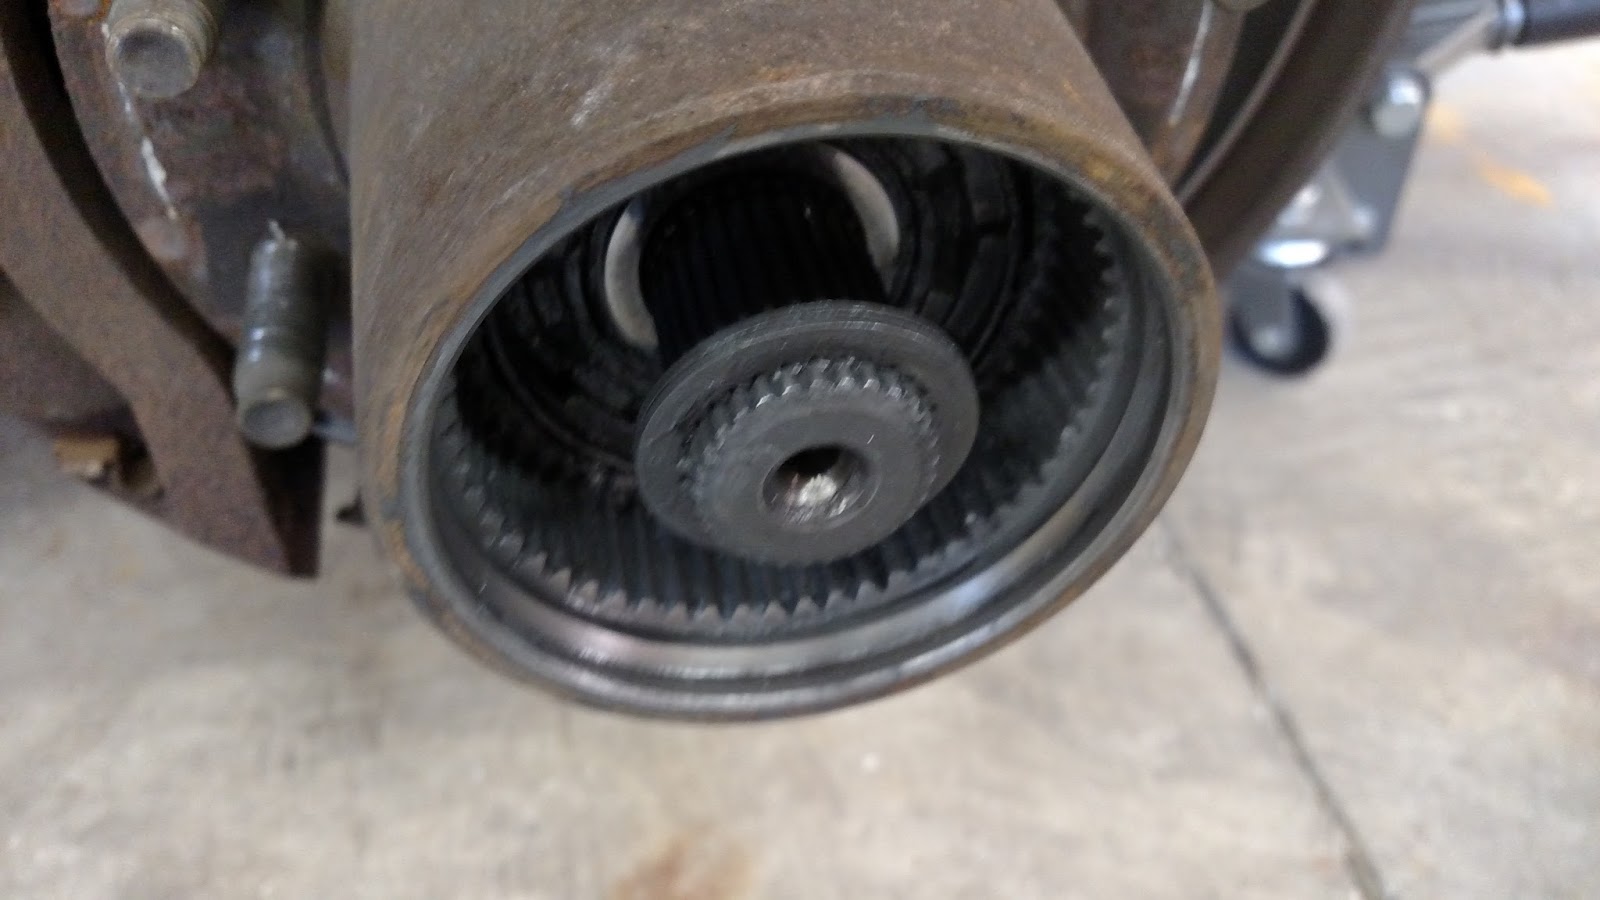
Inside view of the front axle after the hub has been pulled out. Just to the left of the spindle, you can see the hole of a snap ring that holds a couple of washers in place.

Cheap Harbor Freight snap ring pliers, and the removed snap ring. These flimsy pliers barely lasted long enough to do the snap rings on both sides of the truck. I don't expect very much from Harbor Freight tools, but they usually last longer than one use!

Two washers sit behind the snap ring. The first one is almost off the shaft, and the second washer is still seated at the back.
A look inside after the previous stuff is out. This thing can now be grabbed with needle nose pliers and pulled off the shaft. Afterwards there is a funny half-circle retaining clip that comes out.

Pieces removed and on the floor. The half clip with the bent tab is on the right. Just before taking this photo, I managed to step on the pick and it got stuck in the bottom of my boot. Be careful about tool placement!

The final part of the removal process is to remove the 2-3/4" OEM bearing retaining nut, using the special tool that you purchased earlier (Powerbuilt 2-3/4 thin-wall socket PN 647068). No photo of this step, sorry! Here is a photo of the thin-wall socket that removes the Ford bearing retaining nut.

Time to put things back together!!!
The new bearing retaining mechanism is pretty cool. It's a couple of retaining rings and a locking washer.

Below is the spindle nut kit for one side. Note the ring on the left has a little pin sticking up on it, at the 12:00 position. This one goes on first, with the pin sticking outwards. Note the washer in the middle. It has a little tab on the inside circumference at the 12:00 position. This prevents the washer from spinning. One of the holes will go over the pin on the inside ring, keeping it from spinning and preventing the bearing pre-load from getting loose. The ring on the right is just there to lock the other two down.

First ring installed, with the pin facing outward. The pin is now at about 9:00 position, after torquing the ring to 50 ft-lbs to pre-load the wheel bearing.

Below: The washer is now in place, with a hole over the pin. Note the tab at the 12:00 position is in the groove on the axle, and this will keep both the washer and the pre-load ring from spinning loose. The holes on the washer are offset, so if a hole doesn't fit over the pin, flip it over, and it will. I had to make a small move on the pre-load ring, because the washer wouldn't quite fit over the pin on either side.

Below, the locking ring has been installed and torqued. Torque spec for the locking ring is 180-205 ft-lbs. I went to 200. It was a bear, because the tool has four little tabs that barely fit into the outer slots. As you apply torque, the socket doesn't want to stay flush to the face of the ring and keeps slipping off.

Below, the tool that torques these rings down. Napa Service Tool 3246. The tabs slip right off when you start torquing hard from one end of it. You might want an assistant to keep the face of this thing flat up against the ring while you crank on the torque wrench.

The correct hub for a Dana 50 axle. #38826

Inside the box are two sets of this stuff. Left to right: Snap ring and cap screws in the bag, manual hub, and cap with operating mechanism. Bottom: Retaining ring for the hub and O-ring seal for the cap.

Install the hub. It only goes on one way, so it's not possible to mess this up. Install the outer retaining ring. It goes around the groove a couple of times like a spring. I used a screwdriver to make sure it was in the groove all the way around.

Using your falling-apart Harbor Freight snap ring pliers, press the inner part of the hub in, and install the snap ring in the groove on the splined shaft. Make sure it's actually in the groove, because the groove isn't very deep.

Place the O-ring inside the cap and set it on the hub. Rotate until it aligns and sets down solidly. Screw in the six hex screws, and you are done! Well, almost.

Since you are this far into it, check your brakes. Mine were about gone, so I did those as well. Remember after you do brake work to pump them a few times to push the slave cylinders tight up against the pads again.

Back together with those beautiful rims - they keep the tires on. I'm not a fan of fancy rims or poser trucks. Ready to cruise Rodeo Drive - or more likely for me, drive to a rodeo.
Before dropping each wheel down off the jack, I tested each hub. In the Locked position, when you spin the tire, it should also spin the front axle shaft. When free, only the wheel should rotate.

The hub swap seems to have turned out well - no wheels falling off or strange noises so far. Also the nasty driver-side pull when I applied the brakes is gone. With my luck repairing vehicles, I'll call that a success story.
Update August 2020:
I finally got around to replacing those god-awful Harbor Freight snap ring pliers. Haven't had a reason to use these, but when I do, they ought to work better than the old ones.

2 comments:
I know this is an older post, but it really got me over a hump with my project 1995 F250 HD with the 460.
On the picture right below the new spindle nut kit, there's a ring with a notch in it that the new spindle nut goes over. Is that part of the axle? I've been banging on it trying to get it to move, but that would be dumb if it's part of the axle. First time dealing with a 4x4.
By the way, your blog is awesome - nuclear stuff, submarines, trucks, land. All my favorite things!
Thanks,
Tom
Heya Tom,
Thanks for the kind words about the blog. Glad you like it.
This was the first time I ever messed with the 4x4 on my vehicle as well, so I get where you are coming from. I just want to be sure I understand what you mean before I start handing out bad advice.
The three piece bearing retaining nut is not part of the axle. None of the stuff that comes in boxes that I gave part numbers for are part of it. Maybe I'm not understanding exactly what you are dealing with. Feel free to shoot me a picture at ex_navynuke@yahoo.com and I'll be happy to try and help you out.
Best wishes,
Mark
Post a Comment