
I had some material left over from a previous drywall DIY project (linked). I decided to tackle another project out in the shop using the remaining materials. I ended up using all the leftover stuff, and had to buy a great deal more material to complete this project, so that logic was a bit flawed...
The shop bathroom is improved a bit since we moved here. After installing the shop furnace and thermostat, I was able control the climate in the shop, and turn the water back on. At that point, I cleaned up the toilet and replaced the parts inside the toilet tank (flapper, float, and shutoff valve). The deep sink had to be replaced, because the basin was cracked. The link to that project about four years ago is here.
Other than the above work, the bathroom is just as it was when we first moved here. We
purchased this house REO, and we never did meet the original owner(s), so
everything is pure guesswork on my part about the condition and
modifications in the house and shop.
A quick description of the room when we arrived: The drywall was installed, but not taped. I think the toilet may have been an after-thought. The concrete floor near the toilet had been cut out and re-poured. The new section of concrete has a much rougher finish, and is not level with the original floor.
The room has a ventilation fan, and also a small wall-mounted electric heater to prevent the plumbing from freezing during winter months. The room has a door installed to trap the heat, while the other room in the shop has no door. The bathroom was plumbed and wired with 240V power for a large capacity (40-50 gallon) water heater. The previous owner apparently never got around to installing a water heater, because the pipes are still capped. I'm hoping to get this done EDIT: The Water Heater is installed now. Several photos of the upgrade follow (click any image to enlarge):
Below: Looking in before starting any work. The boxes contain flooring tiles that I purchased from our church yard sale last year, with the idea installing them in this room. Not gonna happen.

The previous owner had installed a wood stove in one corner of the shop, but that heat probably didn't last overnight or on weekends. The heat was also not consistent enough to prevent the pipes from freezing, so he installed a small electric heater in the bathroom. The previous owner took the wood stove with him when he moved out, leaving an open 8 inch hole in the side of the shop. I installed a more practical and consistent propane furnace in this post (link).
Below:
Looking outwards before starting the project. The door jamb was filled with expanding foam, probably to help trap heat from the electric heater. The electric in-wall heater is at the bottom right.

Looking in after taping and the first mud.

Looking outwards.

Looking in after the second mud coat. This coat takes a LOT of mud. The second coat fills in the valleys where tapered edges of the drywall meet. Where non-tapered edges butt up, you use a lot of mud and feather it out a long way. This makes it less obvious that you have tape on top of a flat drywall joint.

Looking out after the second mud coat. The drywall edges at the vertical joint above the door did not mate up well at all, so there is a lip there. Oh well.

Looking in after a long sanding session with my palm sander at 120 grit. It got a bit dusty at this point. Not fun. I really should buy a decent filter respirator. Dust masks don't cut it in this environment.

In the photo below, the mud has been sanded flush, as well as I could get it. The walls have been coated with clear primer, which is still drying. There was still plenty of drywall dust on the floor.

Below: The first coat of paint has been rolled on. This room took *way* more paint than I anticipated. Each time I'd finish a coat, it would still be noticeably splotchy. In the end it required four coats and 3 gallons of pure ultrawhite paint. I may put a coat with some color on later.

When I was finally OK with how the paint looked, it was time to tackle the floor. The walls aren't perfect. Perhaps I should have added texture to hide the flaws, but once again I got tired of all the time and effort I'd put in. It looks quite a bit better than the furnace/utility room in the basement though!
Onward to the floor...
Below: The section of floor where the sewer drain line was likely installed after the shop was built.

This little cut-out and patch is right underneath where the water heater piping comes out of the wall. Perhaps this is where the water supply line was added after the shop was built?

I removed the toilet and a fair bit of water spilled as I carried it out. You can tell how much more porous the patched concrete is than the rest of the floor by how the water soaked into it. The toilet water supply valve on the left also leaks by :( That is residue from the wax gasket on the steel ring by the way, not poop!

Below, same floor, different view. The walls are finally consistent in color. I polished the copper water heater pipes after removing the painter's tape.

The wax gasket mostly stuck to the toilet base. It's resting at an angle as a result. I put it on a paper towel to prevent wax from sticking to the shop floor. I'll be replacing this toilet. It has a round bowl instead of an elongated one, and it sits really low - and it's hard on these old knees to get up from.

Before I began the next phase, I had to do something about the toilet tank supply valve that was dripping water onto the floor. I had to purchase
and install a length of hose and a cap just to stop a leak for the duration of the floor project. What a pain in the butt! But I had to keep the floor dry or it would have screwed up the project.
After getting some advice from a friend, I bought this stuff. It's called "Self-Leveling Concrete". It's a concrete-like substance that contains polymers (plastic). It behaves like a concrete epoxy that you activate with water. It mixes up very thin, with the consistency of melted ice cream. Like melted ice cream, it will slowly level itself out. You have to spread it around with a trowel quickly though, because it sets up pretty fast.

The instructions on the bag call for priming the concrete to ensure a good bond between your floor and the self-leveling concrete. I'm not sure this is completely necessary, but I didn't want to mess the room up, so I applied primer to the floor. Drying time for this phase was 2 hours. I used a paint roller on a stick. I think the bottle of primer was fifteen bucks, and I only used about half of it.
Below, the floor has been covered with blue primer. The patched sections really stand out. They are also higher than the rest of the floor, which is the reason I needed to use self-leveling concrete.

Below: After the primer was dry, I mixed, poured and spread the self-leveling concrete to bring the floor level all the way across the room. It looked much better than I expected.

Below, the self-leveling concrete is nearly cured. Although you can clearly see the trowel marks, and I never worked on leveling the floor, the whole floor is level.

Dry and walkable after 4 hours! It's quite smooth and level too. This set up really fast, and I didn't get it quite as far into the
doorway as I would have liked. I was afraid to keep working it after several minutes, out of
fear it would set up and not self-level.

Looking out.

I bought three boxes of flooring. These are vinyl sheets 6" x 36" that interlock with each other. They "float", meaning that you don't stick them to the floor with adhesive. When I have them assembled they will lock together to make what will essentially be a tight-fitting "vinyl rug" across the floor.

I chose a finish that's a bit rustic-looking. I can't wait to see how this will come out! I'll update this post at the bottom when I get some time to finish this room.

UPDATE: The job is finished. It looks OK, if you aren't up close.
Below: A couple of rows down. This flooring had sticky strips instead of interlocking grooves. Sorry that so many of these photos are vertical, but it's a small room and I was shooting through the door a lot of the time.

Below: A bit further along. I tried to lay out the planks so that it didn't look like brick-laying. There were several odd cuts to make it look rustic.

When I was done with the flooring, I bought a few baseboards. Then I had to figure out what stain would look close to the vinyl flooring. The toilet supply is still capped and in the way.

After trying all the different cans of stain I had lying around, none of them worked - the wood wasn't taking stain very well at all. I bought this, hoping that it would do the job and just happened to luck out.

Seems OK

The wood has developed a nice mottled finish. Looks pretty nice!

The first baseboard set down for assessment. It looks quite a bit better than before it was stained, and a near enough match for the vinyl flooring. Speaking of stains, the little electric heater has permanently heat-discolored paint - probably from long hours of use before we moved here.

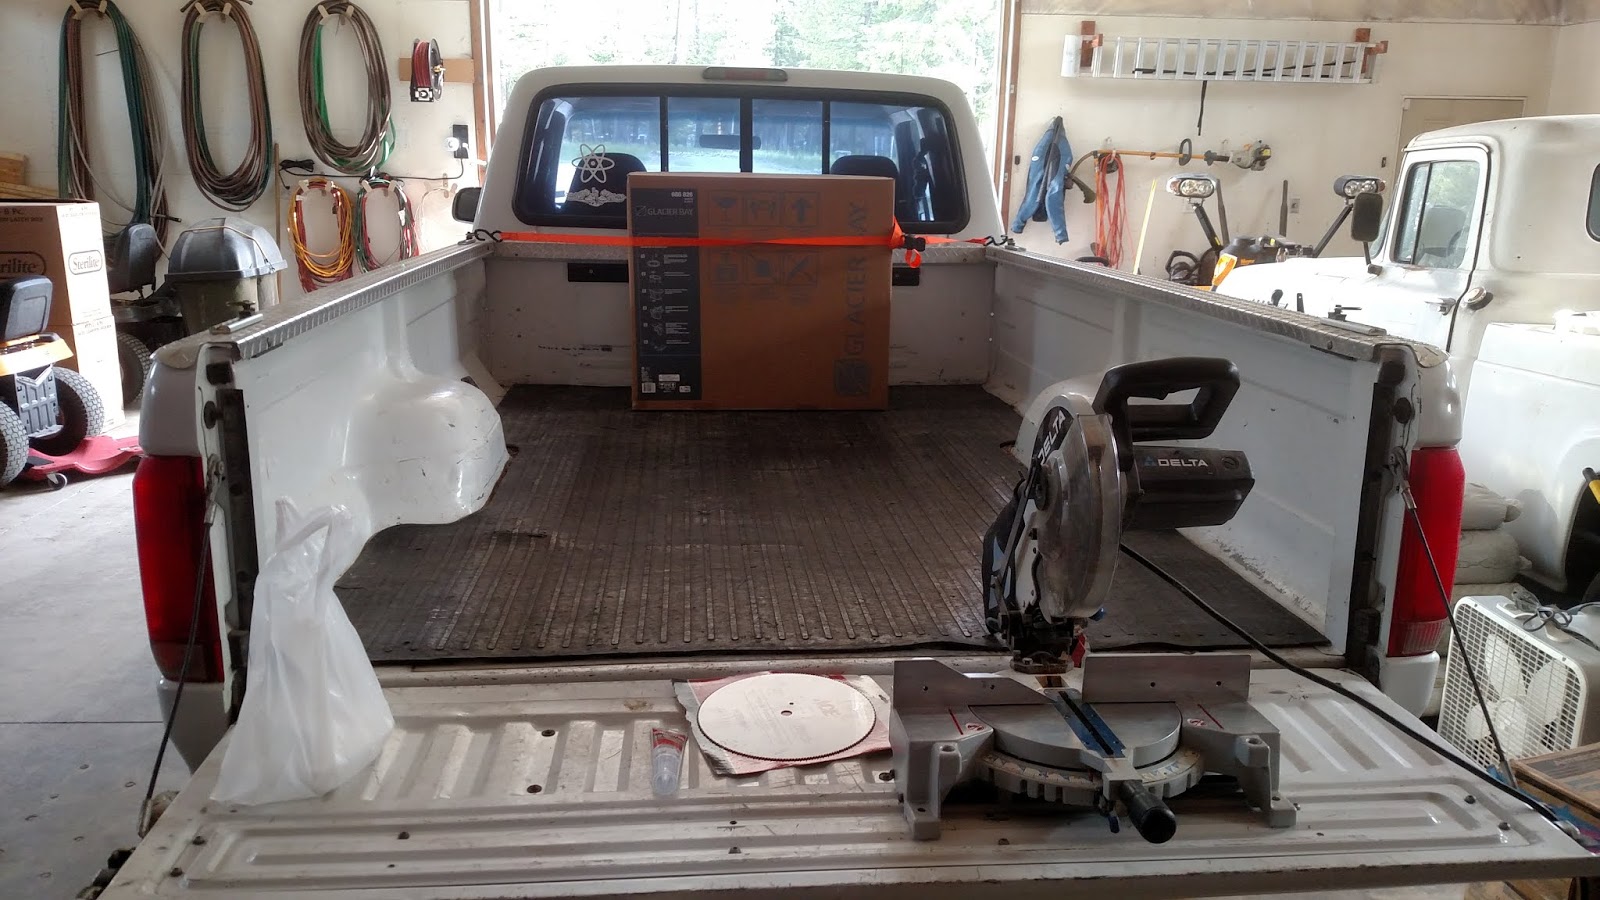
Chop saw with a new blade. Cutting the vinyl flooring destroyed the first finish blade. The replacement toilet with elongated bowl is still tied down in the box.
I was shocked how inexpensive the toilet was. Just $94 at Home Depot. It came with the wax seal ring, installation hardware, tank-to-bowl gasket, seat, and tank internals. The only thing lacking was the hose. Alas, my supply hose was too short, so I had to buy another.
I found these dusty sticks of door frame casing up on top of the bathroom when we moved here. Finally was able to put them to good use.

The door has been framed up. Baseboards are partially done.

Baseboards are completed. Preparing to set the new toilet bowl.

Set in place.

Finished. This phase of the project is complete.

As a reminder it started out like this:
Below, opposite view. Quite a gap at the bottom of the door. Maybe a bit of trim would help that.

Phase 1 is finished, and I'm ready to take a break. I want to have hot water and then make a cabinet across the back wall, but that's going to be down the road a ways. Maybe an autumn project.
1 comment:
Good job! You are my hero!
Post a Comment