Since that post, I've had the opportunity to remove the case and inspect the wiring. I found a really good website explaining a lot about the Eico 950B here. If you don't feel like following the link, I'll share this bit - most of these were sold as kits to hobbyists.
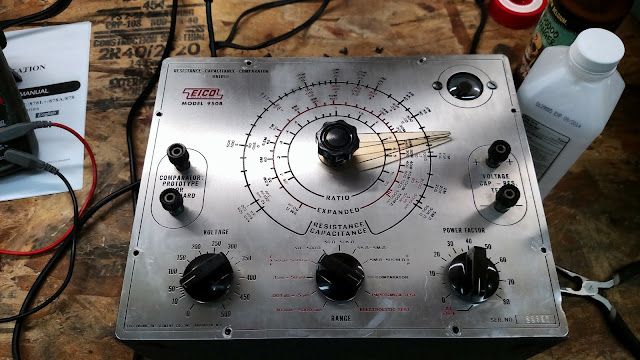
Here's what it looked like when it arrived. Notice the bottom left knob. You can apply up to 500 volts DC to a capacitor connected to the two right-hand terminals. That will put a hurt on you if you aren't careful! (click any image to enlarge)
There are two aspects to revitalizing these things, both of which I enjoy - electronics and cosmetics. I didn't realize how much of each this item needed when it first arrived.
Cosmetically, it didn't seem to need much more than a soapy cloth wipe-down. That turned out to be incorrect. I had forgotten that way back when, lots and lots of people smoked. This thing was covered with a brownish layer of cigarette tar that was very difficult to remove. I didn't want to get so aggressive with the tar that I started taking off paint, so I just kept going over it with Simple Green and isopropyl alcohol, over and over. Even after I thought it was clean, my fingers would *still* stick to traces of tar on the faceplate. Yuck. I should have used gloves too. Nasty stuff.
Electrically, some of the solder joints were poor, and several wires were either too short, or spliced together from two completely different segments. It was a little weird - maybe someone barely had the funds to assemble the thing and had to scrounge up whatever wire they could locate. Looking at the above image, the bottom center range selector switch is indexed. However the switch positions were off from the panelmarkings, because the wires were too short to rotate the body of the switch to the correct position.
Below: The guts of the thing after I took it out of the cabinet. Very simple design and circuitry. The insides were a little dusty, but otherwise clean.
I replaced the short wires and then rotated the scale selector switch so that the switch position corresponded to the front markings. Next I replaced all the capacitors. Lastly I tightened the binding posts where the capacitors are connected for testing.
Below, the transformer in the background puts out 560 volts AC! The rectifier tube at the center converts the AC to DC. The electrolytic capacitor to the right smoothes out the DC ripple from the rectifier tube.
The Eico 950 (and many other vintage instruments) uses a bridge circuit to measure unknown values for capacitance and resistance. Bridge circuits are very sensitive to small changes in the electrical values on either side of the circuit.
Below is an example of a bridge circuit. A voltage is applied from a DC power source at the left (the output of the rectifier tube in the picture above). Resistors R1 and R3 are a matched pair - of known value. "Rx" is a resistor of unknown value. R2 is an adjustable resistor. When R2 = Rx, there will be no voltage between Points D and B, so the meter will read zero. At this point the bridge circuit is "Balanced", and current flows equally through both branches, from A to C. The value of adjustable resistor R2 at which the bridge is balanced, will be the same value as "Rx", our unknown.
Image courtesy of Rhdv - Own work, CC BY-SA 3.0, https://commons.wikimedia.org/w/index.php?curid=2888809
The cool thing about a bridge circuit is how very sensitive it is. Even a minute imbalance between the right and left side of the circuit will cause the center meter to deflect quite a bit. Even though the circuit is simple, there is a lot of amplification going on.
With the Eico 950, voltage developed in the bridge circuit between points D and B is applied to the grid of the tuning eye tube, rather than a meter in the diagram above. When the bridge is unbalanced, the eye looks closed, below.
When the bridge is balanced, the eye opens up at the bottom, as seen below. At that point, you read the scale where the pointer landed, and now you know the value of the unknown resistor or capacitor.
Below, I had cleaned off the knobs, and was on my fourth or fifth wipe-down of the face. There are still some white-ish cigarette tar smears on it. The knobs and posts came clean pretty well. The pointer plastic has yellowed - I tried to clean it and that is not cigarette tar.
I pulled the tuning eye forward a little, and wire-wheeled the screws attaching the face plate to the cabinet. I kinda gave up trying to get all the haze off the face plate. I didn't have the free time available to make it perfectly haze-free.
Update:
I disliked the mottled look of the face plate, and getting it clean was taking a lot of time. I finally removed all the hardware from the front panel and got to work with some aluminum polish and a small pneumatic buffer.
It isn't perfect, but it's a lot better - inside and outside.


No comments:
Post a Comment