Search This Blog

Wednesday, February 27, 2013

How to homebrew with an extract kit

I am still pretty much a beginning brewer, so for right now I prefer to use pre-made extract brewing kits.  A huge advantage of extract brewing (for me, at least) is the time savings you get over brewing with grains.  Making wort from extract takes minutes, while making wort from grains can take hours.  On the minus side, the typical grain batch is 10 gallons, while extract is only 5 gallons.   Also, extract brewing is more expensive than brewing with grains.

I had a Midwest kit on hand for Amarillo Pale Ale, which uses Amarillo Hops for aroma and flavor, and another type of skunky hop called Columbus, for bittering. I love the taste and smell of Amarillo hops. If I could find a cheap source, I would put them in every batch I make.   Heck, I would put it in ice cream.


I haven't mentioned before what ingredients come in these kits.  The primary ingredient is malt extract.  This is either a dry powder or a concentrated syrup containing sugars and enzymes from malted barley and/or wheat.  

The Midwest kits always seem to include some "specialty grains", which are usually roasted malts.  These are used to adjust the flavor of the beer.

Hops are also included.  These hops will be used for bittering, flavor, and aroma.

The kits also include a small bag for steeping the specialty grains, priming sugar to carbonate your bottled beer, and yeast to ferment the mixture (convert the sugars into alcohol).

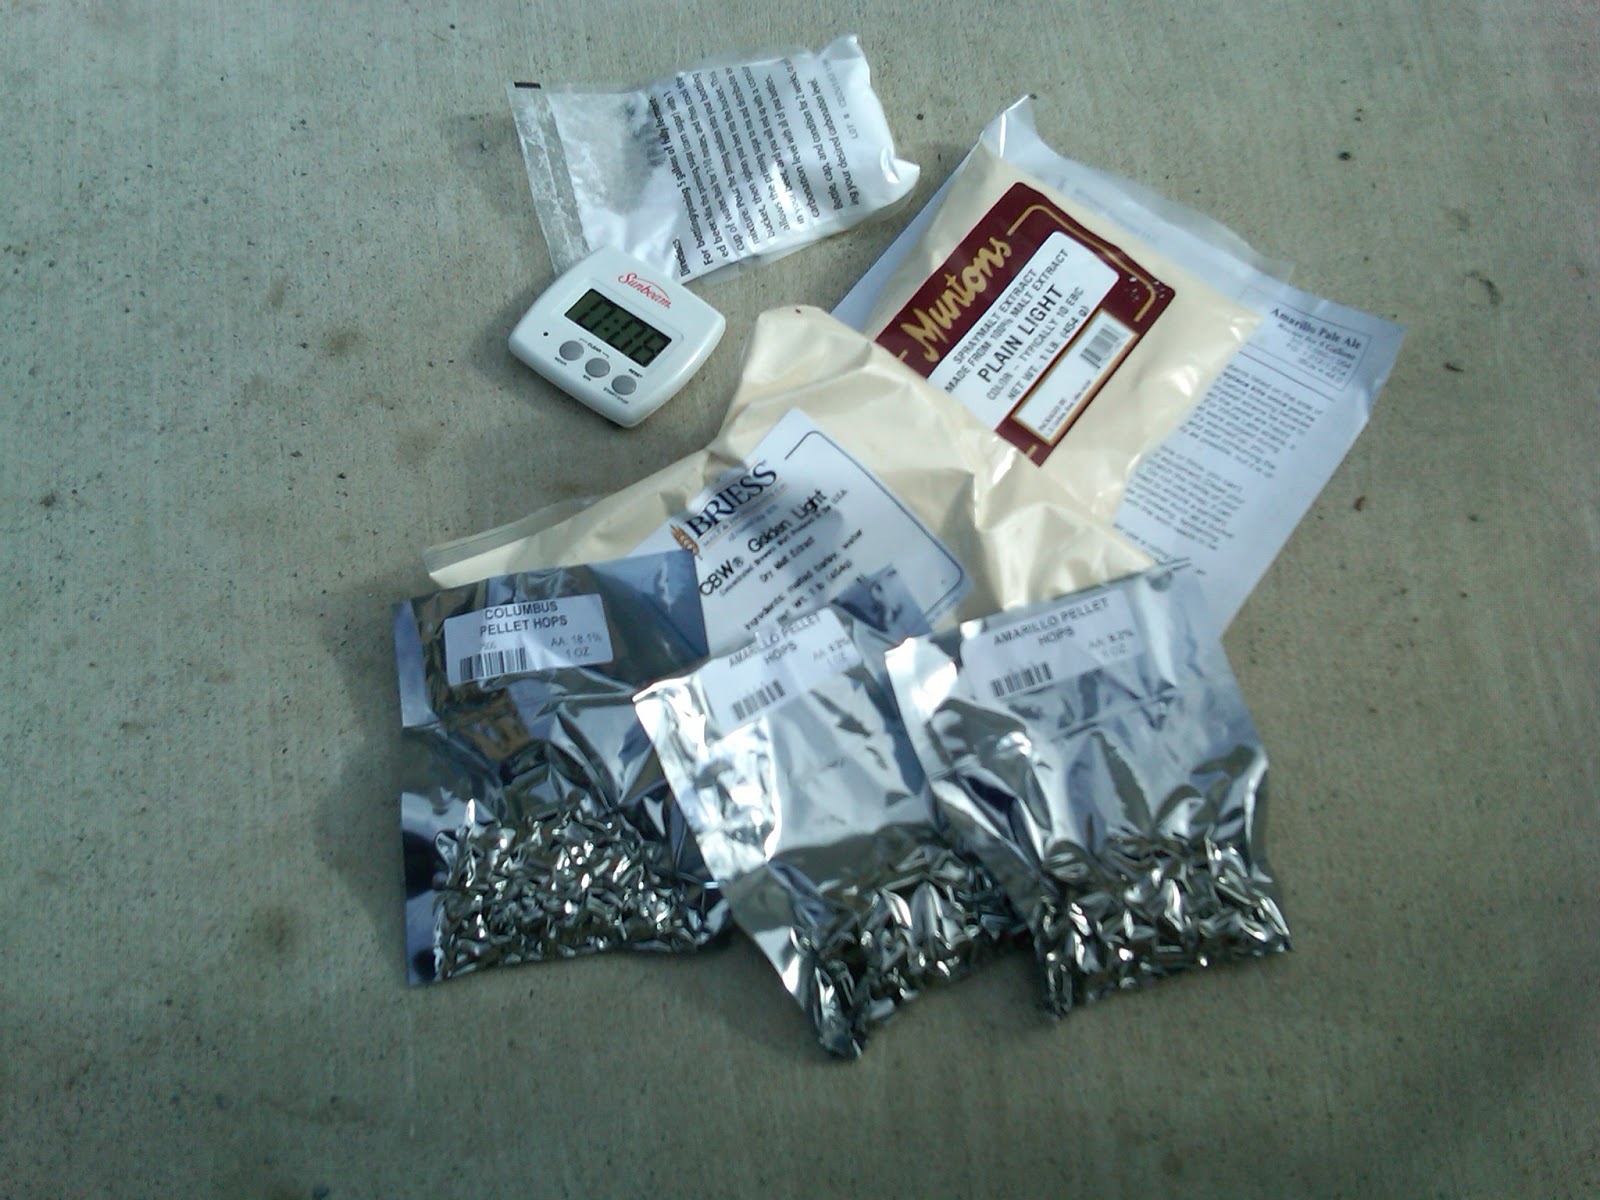
Here are a few of the ingredients for this particular kit that I had near the boil pot:  Priming sugar at the top of the photo, a digital timer (mine), two 1lb bags of dry malt extract, and 3 small bags of pellet hops.
The steps to brew are pretty straightforward:

Take your yeast out of the refrigerator and allow it to begin warming to room temperature.  Shake it up a bit to ensure the yeast are all exposed to the nutrients.

Next, to make 5 gallons of beer, start out with 6 gallons of water.  You will be boiling the mixture for an hour, and one gallon will steam off during that hour.

I like to get my water from the hot water tap in the house because it's already at 130 degrees.  This saves both time and propane.  I have a deep sink to fill my pot, but would use a pitcher at the kitchen sink if that weren't available.  Try to use good-tasting water if you want good-tasting beer. 

Here is a picture of my brewing rig: 
  • Chair to chill out and have a cold one while making more cold ones.
  • Turkey cooker burner and lighter
  • Brew-pot
  • Long-handled stirring spoon and thermometer inside the brew-pot
  • Propane tank 
  • Immersion wort chiller
  • Brew kit and some ingredients between the chair and burner

Bring the 6 gallons up to 155 degrees and hold the temperature there.  You put the specialty grains in the muslin bag and allow the grains to steep in the water for 15-30 minutes.  Pull the bag containing the grains out, and squeeze the juice out of it.  Playtex gloves are nice for this step, because 155 degrees is unpleasantly hot on bare fingers.  Trust me on this!

Here we are in the process of steeping the specialty grains.  I am using a paper binder to keep the steeping bag from falling all the way in.

After the specialty grains are out (I feed them to the deer afterwards), you turn off the burner.  TURN OFF THE BURNER!  Here's why:  Liquid malt extract has the consistency of rubber cement.  It doesn't want to pour.  Because of this, it tends to drop to the bottom of the pot and stick there.  If the fire were on, you would scorch the extract at the bottom of the pot and ruin your beer before you even got it made.  So shut off the heat and give the hot water plenty of time to dissolve this gooey stuff.  Stir it with a long spoon until you are sure it's dissolved.  Then stir some more.

Here's what to do with the Liquid Malt Extract to improve the dissolving process.  I put it in a water bath and pre-warm it on the stove while steeping the specialty grains.  This helps thin the stuff from rubber cement to more of a syrup consistency.

This should give you an example of the consistency of liquid extract at room temperature:


I prefer the dry malt extract for a couple of reasons.  First, since it's not watered down, pound for pound, your beer will be stronger.  And second, unlike the liquid extract, it floats.  It doesn't sink to the bottom and try to burn itself up on the bottom of your pot. 

Now that we have dissolved the malt extract in hot water, we have the basis for beer!  When you dissolve malt extract in water, you have made the Wort (pronounced "Wert").  But we aren't done yet.  You could perhaps make beer from this, but it would be sweeter than pepsi.  Worse, it might become a bacterial science experiment.  So let's boil the wort, shall we?

Light your burner and bring the wort slowly up to a boil.   Slowly, because you can also scorch the sugary wort on the bottom of your boiling pot.  Slowly for another reason too.  Our wort is full of sugars, starches, and proteins, so the bubbles like to foam up and over.  A boilover of this stuff is messy!  You have to watch it like a hawk and be ready to cut the gas off.  Shortly before it begins to boil is when the "protein break" happens and a boilover is likely.  Afterwards the danger is over.  Just get it back to a rolling boil.

Once it comes to a boil, we set a 60 minute timer, and add bittering hops.  The hops you add will be either pellets or leaves.  This kit comes with pellets.  You can drop them loose in the wort, but I prefer to put them in the steeping bag.  I clean out the steeping bag of the specialty grains and re-use it for the hops.  You don't want all that plant material in your fermenter.  It will make your beer have a grassy taste.

We now have our wort boiling and killing any germs in the mixture.  The boiling is also releasing oils from the hops, which over an hour will bitter the beer, countering the sickeningly sweet mixture with some bitterness.  At about 15 minutes before flame-out, I place the wort chiller in the boiling wort to sterilize it.

Depending on the beer, most recipes will call for other hop additions.  These can occur anywhere  in the boil, but mid-boil hops are for flavor/bittering, and toward the end are more for the "nose" or aroma of the beer, and not for bittering.

Assuming all the hop additions were done properly (at the correct time and correct amount), we are ready to shut off the fire and cool our wort down and let the yeast begin working their magic!

I use an immersion wort chiller to quickly bring the wort down to a temperature where yeast cells can survive.  You can do it with an ice bath, but it takes longer and increases the chance of an infection.  After about 5 minutes of chilling with the wort chiller, the wort is down below 80 degrees, at which point the yeast cells can survive.

Hopefully by this time your dormant yeast will have warmed up, your sterile wort will have cooled down, so the yeast won't have to deal with a big temperature shock. 

There is one thing you need to do before adding the yeast, however.  When you boil water, you de-aerate it, driving off all the oxygen.  Yeast need oxygen to get started, so you need to aerate the wort.  Some folks slosh the wort around vigorously, while others pour it back and forth between containers.  I'm lazy and worried about infection, so I use an air compressor and a sanitized tube to blow bubbles from the bottom of the wort for about 30 seconds.

Next we pour the wort into a sanitized fermenter.  The fermenter is a sealed container that keeps the wort and yeast in, releases gas the yeast generate, and keeps the germs out.

Then we pitch the yeast.  That's what it's called: "Pitching the yeast".  It means we are adding yeast to our wort.  Then we place an airlock on top of the container, filled with sanitizing solution.  The airlock will allow the container to breathe, while killing any germs that might try to get to our beer.

After a day or so the yeast will have adapted to their new environment and start devouring all that sugar and releasing alcohol.  At that point so much gas will be generated that the airlock will be bubbling continuously and it will smell like beer.  After a couple of weeks, the yeast will pretty much be done, and all we have to do is bottle it!

Here is a picture of fermentation at the beginning of the process.  This is two days after brew day when the yeast was pitched.  The layer of goop on top of the wort is called krausen.  

If the yeast is very vigorous, or you don't have enough head space in your fermenter, this stuff can expand, plug your airlock, and blow out of the fermenter.  That HAS to be nasty to clean up, as well as potentially infecting your beer with bacteria.  Here is a picture I found on the internet of such an event.  I know the wife would be most unhappy about a mess like this!

Back to less eventful brewing... I used a hot pad to warm the wort and help get the yeast active.  The note on the fermenter is to remind me when I brewed and what kind of beer is fermenting.  I have 3 different batches going right now, and don't want any confusion.

I don't actually bottle my beer, once again because I am lazy, and don't feel like washing and sanitizing 55 botttles every time I brew a batch.  Instead I wash and sanitize ONE cornelius keg (AKA corny keg).

Another advantage of keg storage is that you don't have to boil and then add priming sugar to your beer prior to bottling.  Priming sugar is used to give the yeast something new to eat and allow them to make CO2 gas, to carbonate beer in the botttle.  With a keg, you carbonate your beer with a gas cylinder and regulator.  I don't waste the priming sugar however.  I add it to the wort to make the beer stronger!  For a detailed post on how to transfer and store your brew in a cornelius keg, click here.

And here is what all that trouble is for:  Something the big breweries will never make - beer with flavor, character, and potency!


Monday, February 18, 2013

Homebrews #4 and #5

OK so it wasn't ALL work this days off.  We had one single day where the weather was warm-ish and not windy, so I chose to brew up a couple of batches of beer. 

I prefer to brew two 5 gallon batches back-to-back, because home-brew setup and breakdown both take me a fair amount of time.   Someday I will have a proper setup with a rolling cabinet, but that is not the case right now.  I have to haul each piece from storage to where I am brewing.  In this case, I needed to be near the garden hose.  Eventually I moved to a spot in the sun so I could keep warm :)

This first bach is called Cologne Kolsch.  The wife likes Alaska Brewery Summer Ale, so I am giving this a shot.


Below is the second batch, a Christmas gift I received, which is a Belgian Honey Wheat.   It comes with orange peel and coriander flavorings, and should taste similar to a Blue Moon, but with about twice the kick.

Here the grains are steeping for 30 minutes before bringing it to a boil.  The copper coil in the background is the wort chiller, which quickly brings the temperature down after the boil.  This allows you to quickly get the temperature down to where yeast can survive and then get it sealed up before airborne germs can infect the beer.

Basement is finished!!!

We ordered some cheap industrial carpet for the big 30x15 room in the basement to finish it up.  The carpet was installed on Wednesday, and our handyman installed the baseboards on Friday. 

I could have done the baseboards (I have installed my own before), but I wanted it done quickly and without having to lose a couple of my days off over the job.  The handyman matched the stain and style, then clear-coated them all before even coming over to do the job. 

While he was installing the baseboards, I replaced the light fixtures with something more appealing than the old ceramic bases and bare bulbs.


After the baseboards went in, I set up my home gym. It's been a LONG time since I've had this set up, and I never had this amount of room before. It used to be on one side of the garage in Bakersfield, which was pretty tight. We put down the interlocking foam sheets for two reasons: 1) So I don't cut the new carpet when I drop a weight, and 2) I sweat like a pig when exercising, and didn't want to sweat all over the new carpet either :)

The other end of the big room will be for storage, and we have a lot of work do do in that respect. We still have a ton of boxes to unpack, but have stacked boxes containing most of my wife's seasonal decorations. One more rack like this and a couple of Home Depot cabinets, and we should be set.

This is what we started with.  So glad it's finished!!

Saturday, February 09, 2013

One final day in the closet

After complely removing all shelving and poles in the closet and then rebuilding it to suit us, the texturing and painting still remained.  My wife is always in charge of spackling and texture, while I am in charge of ...whatever she tells me to do... :)

Anyway, I bought a can of oil-based quick-drying wall texture.


Which immediately gave both of us massive headaches. You are supposed to use it in a well-ventilated area, which the closet is not. A fan just distributed the skanky odor outside the closet into the bathroom and master bedroom. Some contents of this can: Mixed Xylenes, Toluene, Acetone, Isobutane, Ethylbenzene, and propane propellant. That's just the hydrocarbons that turn to vapor, not the texture itself! If you decide to use this product, get the slow drying formula instead! Save a few brain cells for cerveza to kill.

On the bright side, since the stuff dried so quickly, by the time we poured the paint and spread the drop cloth, we could start painting.  And so we painted.  It turned out really nice.  Check it out!


Saturday, February 02, 2013

Two days in the master closet...

No, I am not in trouble with the wife.  In fact I may have scored a few points!

When we left California, we loaded up our 5th wheel trailer pretty much to the roof, and used it as a moving van.  Most of the stuff in there wasn't everyday stuff, and a lot of it was clothing that we could no longer fit into.

We dug through the 5th wheel to try and locate some drapes that I wanted to put up in the office.  We never did find the drapes... However we realized that a lot of the clothes in the RV now fit again, because  we have each lost about 35 lbs since going low-carb back in October.

Which brings me to the master closet.  It's a room about 12ft x 8ft, with a 9ft ceiling.  Each side had a single pole for hanging clothes, and a shelf with about 3ft of wasted space above it.  We decided to reorganize the closet because there was room for two poles per side.  It would also allow us to empty the clothes out the RV, and maybe use both the clothes and the RV for the first time since leaving California.

Here is my side of the closet.  The white line is the elevation of the footer board that supported the original shelf and clothes rack.  Since the footer board was caulked to the drywall, I pulled a fair amount of drywall off when I tore it loose.

Here is my side of the closet with the lower shelf and pole installed.  My wife spackled a few holes in the wall as well.

Here is my side of the closet, completed, and loaded with clothes from both sides of the closet. At this point we were preparing to demo the other side.

Before photo: My wife's side, looking toward the door. This side was slightly more complicated because we needed to split it out, leaving one tall section for longer clothing like dresses.

Before photo: My wife's side again, this time looking through the door into the closet.

After Photo: My wife's side looking toward the door.

After photo: My wife's side looking through the door.


I am very happy with how it all turned out. We doubled the clothes hanging area of the master closet for about $100. Most of the cost was particle board and hangers, and I had the guy at Home Depot make 90% of the cuts. That saved me a ton of trips across snow out to the shop where my table saw is located.  The handful of cuts I had to make, I did with a small Skil Saw.

We still need to texture the walls and then paint. If you look closely in the last photo, you can see the red can of spray texture on the lower shelf. Next time I am off shift, we will be finished with that project!

The follow-up post where we texture and paint the closet is here

Monday, January 07, 2013

New job skilz!

Last month at work we were required to watch a 45 minute long video on how to plow snow.

Let's just say that watching the movie did not make me a proficient snowplow driver :) 

I spent about 4 hours last night plowing, taking a 1 hour break to start up the plant.  By the time I was finished with the start-up, the snow had piled up so deep it didn't look like I had even plowed!
Here's a view from inside, having pushed a huge pile off to the side of the parking lot.  

And here's a view of my new play toy.  Those white streaks are snowflakes falling past the camera during the shot.

Saturday, January 05, 2013

Winter experiences

Well, with that last post I pretty much described the silly and not so fun part of living in cold country.  Time to balance that with some really cool stuff!

Like watching the eagles:

Yes I took this picture.  Too bad the damn camera focused on the hill instead of the bird :(


Interestingly when perched in a tree, the eagles always had their backs to us. Maybe that's eagle body language for "go away, jackass".


And there is also fun stuff you can do in the snow.  We haven't set aside a day for skiing yet, but we will.  For now, there is sledding!


And spectacular scenery...


So while it may be a challenge to get to work in the early morning...


The positives totally outweigh the negatives.  Happy New Year!

Snowfall

Sooo...

We got a couple of feet of snow over two days in mid-December.  Because I was on shift at the time, I didn't have much opportunity to clear it out of the driveway (which is long).  As a result, I only cleared a little of it before daylight ended and I needed to get ready for work.  As I left for work, the truck got stuck in the driveway.  I had to take the wife's AWD to work that night.


The following day I shoveled snow from under the truck's tires and pulled it back to the garage using the tractor.  I decided that I needed a lot of weight above the rear axles and some excellent snow tires - to replace the crappy snow tires that were on the truck.

I was still on shift however, so I continued to take the wife's car each night until I got a day off.  Meanwhile, the weather warmed up enough to melt some of the snow, then froze again.  So the snow that I didn't get removed is now clumpy and icy.  Due to the ice and the slope of the driveway it still sometimes requires 4WD to get the truck rolling after I back out of the garage.

We also had a really cold snap where it got down to 5 degrees overnight, but fortunately I wasn't on shift and just had to sleep through it!

The Christmas decorations that we used to put up in the yard in Bakersfield were totally buried in snow (which is now snow with a thick icy crust).  They also tripped the GFCI circuits.  Digging them out would be a total pain in the ass and would probably damage them.  So I guess they will remain encased in ice until spring thaws them out.

I used to have something like this in front of the house:


Now I have this:


On the bright side, it's nice not having to pay a lawn guy year round :)

One day, not long after the big snow, we were in Coeur d'Alene doing some last minute Christmas shopping.  When we returned home, we found that a snowplow had cleared the road in front of the house, leaving a 4 ft wall of snow blocking the driveway.  I hopped over it and got the tractor out while the rest of the family waited in the car on the street.  After about 10 minutes I had enough snow removed that the car could get over the hump without bottoming out.

Guide to Wheelies

Not my guide, but quite funny!

The World Famous Phuzzy's Guide to Wheelies

By: PhuzzyGnu

Wheelies are an integral part of the motorcycling experience. Within the next few paragraphs you will find information on wheelies gleaned from more than 5 minutes of wheelie experience by that world-famous stunter, PhuzzyGnu.

Part One: Overcoming Mental Barriers

Perhaps one of the difficult aspects of wheelies to master is the fear of what scientists call "Busting Your Ass (BYA)." This is a very real and likely phenomenon associated with wheelies, other stunts, and motorcycles in general. Here are a few hints:

  1. Start out small. You are not, and will probably never be, Gary Rothwell. So don't go big until you think you're ready.
  2. Never confuse your intentions with your capabilities. See #1 above.
  3. Wear safety gear. Helmet, gloves, boots, jacket, and back protector are my usual gear when riding, and as a matter of fact you should probably wear full leathers. If you do not wear these items and you mess up a wheelie, you will be scarred and misshapen and unattractive to the opposite sex. Wearing safety gear also makes you feel more confident.
Part Two: Equipment
To do a wheelie, you will first need a motorcycle. Any kind of motorcycle will do. I personally have a friend that wheelies his Gold Wing. For our purposes I will assume you ride a bike with some sporty capability, though the process is the same for all bikes. Dirt bikes are good to learn wheelies on, because they crash cheaply. Friends' bikes are similar in this regard.
Here are questions to ask your bike:
  • Are you in basically good shape?
  • Do you have a smoothly operating throttle?
  • Do you have a clutch in working condition?
  • Do you have a rear brake in case I need to save my ass?
If the answer to any of these questions is "no," you might have to find a new motorcycle. If your motorcycle does not answer, don't worry, motorcycles don't usually answer anyway.
Part Three: Where should I practice my wheelies?
Practice wheelies somewhere you can be an idiot on a motorcycle without many people minding. Also look for good pavement and, most importantly, a total absence of police (see section 4 below.) Alternatively, in front of girls' schools and in front of hospitals are good places to practice wheelieing.
Part Four: The Man Hates Wheelies
Cops HATE wheelies. It brings out some primal reaction in them. They will throw the book at you. It may be called "failure to control vehicle" or "not in complete control of vehicle" or "improper start from a standing position" or "exhibition of acceleration." DO NOT DO WHEELIES IN FRONT OF COPS. Mothers also dislike wheelies. On the other hand, young children (young boys especially) love wheelies. Most other women do too, though they usually won't admit it. It is best to do wheelies for women at every opportunity. (If you are a woman, by all means do wheelies. It goes without saying than guys love wheelies and a woman doing a wheelie could probably manipulate most men into doing most anything.)
Part Five: To Clutch or Not to Clutch?
If your bike has big power and/or light weight, you don't even need the clutch- you can get the front wheel up with just the throttle. GSXR-750s, Bandit 1200s, Blackbirds (my bike), TL1000s, VTR1000s, R1s, ZX-9s and other bikes with Lots-o-Torque or Not-Much-Weight can bring the front wheel up with just a big, or even not-so-big twist of throttle. Simply riding forward, rapidly closing and opening the throttle can get the front wheel WAY up on some of these bikes. Some bikes just require you to open the throttle. Other bikes require the use of the clutch, which is that lever on the left clip-on (or handlebar if you ride on of "those" bikes.) I'll assume if you have a bike with big power you don't need my help anyway.
Part Six: Will this hurt my bike?
Wheelies done right are harmful to neither bike nor clutch. Use low revs and torque to wheelie, not massive revs and horsepower. Slower speed wheelies are also easier to control. Wheelies done wrong can damage chains, head bearings, forks seals, and, in worse-case scenarios, bodywork and even you.
Part Seven: What if it all goes wrong?
If it all goes wrong, hopefully you have the back brake covered, you mash it, and the front end slams down, smashing your grollies into the tank (if you are a guy) or smashing those mystical parts into the tank (if you are a girl.) If it goes REALLY wrong, and you ether didn't have the brake covered or you miss it completely (it happens), the bike will bodyslam itself into lots of expensive pieces, from about 5 feet up. It might also land on you. Try to fall off to the side. If you are not wearing gear, you will be in a world of pain, even at 20 miles per hour. Even wearing gear, you can still get hurt bad, okay?
Part Eight: The Wheelie
Having read this far, you're ready to try wheelies. Briefly, the following are the steps to the Wheelie.
Cover the back brake. It will stop you from flipping over backwards if you go too far.
Accelerate at about 1/4 throttle through 20-30 mph.
Squeeze the clutch.
Roll on more throttle.
Let out the clutch.
Steps 2-5 are almost simultaneous:
Step 1- The back brake will save your ass if you start to go over backwards. Until you are very proficient at wheelies, you should always cover the back brake just in case.
Step 2- You need to be accelerating gently to get the weight on the back wheel. Once you become proficient, you can do a wheelie from any speed, but we'll start like this, ok?
Step 3- Squeezing the clutch gets the engine spinning faster and making more power, of course. You don't have to squeeze it all the way in, just enough to get it slipping, thus spinning the motor up and getting more power.
Step 4- Giving a little more gas increases the engine spinning as noted in step 3 above.
Step 5- Letting out the clutch is the key to a smooth wheelie. Don't just pop out the clutch, or the front end might leap in the air and scare you away from wheelies for a year. Let the clutch out smoothly and quickly, as if you were pulling away from a light really fast. If you have ever been in a stoplight drag race and had the front end come up on you as you left the line, that's exactly how the clutch should come out.
In any case, unless you are really ballsy or just stupid, the front won't even come up the first time. You'll just kinda jerk forward a bit. No problem. Now, do it again, with a wee bit more throttle, engaging the clutch a wee bit faster, sneaking up on the wheelie. It probably won't come up this time either. Just keep on giving a wee bit more gas and a wee bit quicker (but still smooth) clutch engagement, and eventually the front will come up more and more. More throttle- more air.
Steering wheelies is just a matter of centering your weight. You lean to one side, you go to one side. Turn the front wheel one way, you'll go the other way, just like countersteering. Stick a knee out and you'll go that way. Simple. Just sit straight up and hold the bars straight at first, ok?
The front wheel has a gyro-effect, so if it stops spinning, turning the front can't steer you anymore and when you finish the wheelie it'll have to spin up to speed. If you are going fast enough, you'll get a chirp and a puff of smoke, but let's save that for later. If you set a wheelie down crossed up you can get a nasty tankslapper and get tossed, so try not to do that either, unless you like tankslappers.
Once you can consistently get the front end up higher and higher, then you can think about going just a bit further!
Part Nine: What now?
Okay, now you are getting the front wheel up regularly. Now you can find the balance point. Basically, it's this floaty, light point in a wheelie that is really damn high up there where you don't have to use as much throttle and you can basically keep it up indefinitely.
Part Ten: More Gears!
You aren't limited to 1st gear, of course. Once you are proficient at wheelies, you can use other gears. You can wheelie most sportbikes in 1st and 2nd and maybe 3rd gear, and some big boys like the R1 or the ZX-9 or maybe a Blackbird might be wheeliable even in 4th. I haven't brought a bike up, ever, in 4th, but it is possible.
  
Alternatively, you can start out in 1st and go up through the gears as far as your balls (or ovaries), the road, and your skill will let you. The current wheelie record is well over 175 miles per hour, so get out there. To shift in a wheelie all you need to do is twitch your right wrist to unload the gears, while having your left toe already pressuring the gear change. No clutch necessary. Some Hondas and other bikes, my Blackbird included, have a big throw from first to second. Give it a big, positive kick into second to avoid missing a shift, having the engine rev the tits off itself, and then having the front wheel slam down to the jeers of any witnesses and to your own shame and possibly mashed privates. If you do get it into second it will want to kick a little higher, so be ready to modulate the throttle. Of course, you haven't' tried to shift into 2nd until you were really familiar with balancing these things, so it's no problem. Now you can go into 3rd and 4th and 5th and 6th, and you're the man (or woman) and you can make money at this.
Part 11: Variations.
Once you're quite the badass, here's some things to try.
Standing up. Easy, stand up on the pegs and wheelie away. Cool, eh?
Crossed up. You'll have to turn the bars and stick out the opposite knee to get a nice, crossed up, rad effect.
  
Waving/Flip off/other gestures. Take your hand off (your LEFT hand!) and do whatever you think would be cool. Extra points for flipping off cops, if that's your kinda thing.
Passengers. If you have a trusting friend, go for it. It is actually easier because of the weight distribution, but the stakes are higher for obvious reasons.
  
There are other variations, but if you are good enough to think of them and do them, you wouldn't be reading this, would you?
Part 12: It Ain't My Fault
Phuzzy accepts no responsibility whatsoever for anything that might happen to you if you decide to read this and go out and practice the techniques described herein. Wheelies are inherently dangerous because motorcycles have two wheels for a reason and if you take one of them off the ground, you open up a whole new realm of possible ways to maim yourself. Don't be stupid. Don't blame me if you end up having aftermarket titanium parts installed on your body if something goes wrong. Have fun.