I saw this graphic on the internet recently, and thought it was important enough to share. The Craft Beer you think you have been drinking might just be a "Crafty" corporate beer.
The big dogs in the brewing industry have been buying up smaller independent breweries. The big players have been losing market share (and profits) to small brewers who are willing to brew great original beer. Sales of swill beer have been spiraling downwards, and something had to be done to compensate for the loss in sales... so the mega brewing companies have been buying out the craft brewers - and then cheapening the product to improve profit margins on their new purchase.
They have also been buying distribution networks and excluding craft beers from distribution, while continuing to carry their own brand. Sometimes I get the sense that large business doesn't really enjoy or want healthy competition.

An advertisement-free blog about motorcycling, Northern life, home improvement, power plants, submarines, nuclear stuff, and a few other off-beat subjects. Comments are welcome. (Image is the Selway Crags in Northern Idaho)
Showing posts with label Brewing. Show all posts
Showing posts with label Brewing. Show all posts
Wednesday, August 01, 2018


Wednesday, April 10, 2013
Beer and Deer
We have a few families of deer (fawns and does) that we have been feeding through the winter months. They come around for breakfast and dinner, when we pour out a pitcher of corn. They are not quite tame. You cannot get very close to them, but they are also not too concerned when they see a human nearby.
The brew is a Blue Moon Seasonal called Valencia Grove Amber. Quite a tasty orange-wheat flavor.

The brew is a Blue Moon Seasonal called Valencia Grove Amber. Quite a tasty orange-wheat flavor.

Saturday, March 02, 2013
All-Grain Brewing
At some point I would like to try my hand at All-Grain brewing. I mentioned before the advantage of expense. Price isn't much of an issue for me. What I'm really interested in is learning and performing the entire brewing process, as it is done without factory-made supplies. I could see myself evetually running a brew-pub, if I had enough experience and success :)
With Extract Brewing, you are using malt extract that was produced from malted grains in a factory, and dissolving that in hot water to make wort.
With All-Grain Brewing, you are making wort the traditional way: Steeping several pounds of malted grains in hot water for an hour to extract the sugars. This is called mashing. Afterwards you drain the liquid from the grains and rinse hot water through to extract all the sugars. You have then created your own wort, without the need for a factory.
A big advantage of All-Grain brewing over extract brewing (particularly Kit Brewing) is that you have infinitely more options on how to brew. While I can (and do) add more malts/hops than an Extract Brew Kit provides, you have way more options when all-grain brewing.
All-Grain brewing requires three large vessels: A bucket for lots of hot water, a bucket for the grains to steep (called a mash tun), and a boil bucket for brewing. So far I only have one of these items, a large keg with the lid removed.

This is a photo of a keggle (keg+kettle) I found on the internet. Mine has the lid cut out, but does not yet have a valve or temperature gauge. Both items will be useful for the Hot Water bucket.
Next I will need a Mash Tun. Remember the mash tun holds the grains while they steep in hot water. The mash tun can be made from an Igloo cooler with a few small modifications. The modifications allow you to drain the wort after the grains have steeped in the hot water, while leaving the grains behind. Here is an example: A cooler with a strainer at the bottom.

And lastly, I will need a bigger boil bucket. The one I have is a 36 qt, and I need more like 12-15 gallons of room for a 10 gallon boil. Basically I need another keg with the lid cut off. They are hard to find, and expensive.
There are a couple of different arrangements you can use to brew All-Grain. Because the liquid gets transferred twice, you need a way to do accomplish the task. The simplest is using gravity. Hot water tank down to mash tun, down to boiling bucket. Here is an example of an all-grain brewing system using gravity transfer:
 Alternatively, if you don't mind paying for a pump and a few fittings (and cleaning them out after brewing), you can set up the rig horizontally, like this:

I like this arrangement best because you don't need a ladder to reach anything, and importantly, there is no danger of hot liquids falling on you in the event of an accident. I think I could put this together.
A second burner might be nice, but I should be able to move it from the hot water tank to the boil bucket if I build the frame with that in mind. I have a birthday coming up, so maybe I can convince the wife to get me a gas welding rig and some square iron!
With Extract Brewing, you are using malt extract that was produced from malted grains in a factory, and dissolving that in hot water to make wort.
With All-Grain Brewing, you are making wort the traditional way: Steeping several pounds of malted grains in hot water for an hour to extract the sugars. This is called mashing. Afterwards you drain the liquid from the grains and rinse hot water through to extract all the sugars. You have then created your own wort, without the need for a factory.
A big advantage of All-Grain brewing over extract brewing (particularly Kit Brewing) is that you have infinitely more options on how to brew. While I can (and do) add more malts/hops than an Extract Brew Kit provides, you have way more options when all-grain brewing.
All-Grain brewing requires three large vessels: A bucket for lots of hot water, a bucket for the grains to steep (called a mash tun), and a boil bucket for brewing. So far I only have one of these items, a large keg with the lid removed.

This is a photo of a keggle (keg+kettle) I found on the internet. Mine has the lid cut out, but does not yet have a valve or temperature gauge. Both items will be useful for the Hot Water bucket.
Next I will need a Mash Tun. Remember the mash tun holds the grains while they steep in hot water. The mash tun can be made from an Igloo cooler with a few small modifications. The modifications allow you to drain the wort after the grains have steeped in the hot water, while leaving the grains behind. Here is an example: A cooler with a strainer at the bottom.

And lastly, I will need a bigger boil bucket. The one I have is a 36 qt, and I need more like 12-15 gallons of room for a 10 gallon boil. Basically I need another keg with the lid cut off. They are hard to find, and expensive.
There are a couple of different arrangements you can use to brew All-Grain. Because the liquid gets transferred twice, you need a way to do accomplish the task. The simplest is using gravity. Hot water tank down to mash tun, down to boiling bucket. Here is an example of an all-grain brewing system using gravity transfer:


I like this arrangement best because you don't need a ladder to reach anything, and importantly, there is no danger of hot liquids falling on you in the event of an accident. I think I could put this together.
A second burner might be nice, but I should be able to move it from the hot water tank to the boil bucket if I build the frame with that in mind. I have a birthday coming up, so maybe I can convince the wife to get me a gas welding rig and some square iron!
Friday, March 01, 2013
How to Keg your Home Brew
In the previous post I mentioned that I keg my beer. I thought it might be helpful to explain how I accomplish that task.
First off, sanitation. I mix up a 5 gallon bucket of Star-San (dilute phosphoric acid). Star-San is nice because it won't attack stainless steel, as bleach will. Also, amazingly, it is not necessary to rinse Star-San from your equipment before using it. Heh. Try that with bleach!
Star-San is a weak acid that will kill germs with about 60 seconds of contact time. Since it is a weak acid, and your wort is quite basic, the wort basically neutralizes the traces of Star-San, and poof, it disappears as your wort contacts it! Awesome stuff!
So, I start with a clean keg that has been washed out with with soap and water, and rinsed well. Then I place the siphon and pump into the bucket of Star-San, and get them thoroughly sanitized. After that I pump several ounces of Star-San into the keg. I put the lid on the keg and shake it until I am confident that the solution has soaked the entire interior of the keg.
Next I remove the "gas in" and "liquid out" fittings and soak them in the solution for a minute or two, then re-assemble the keg. Put a little CO2 gas in the keg and flow all of the solution out the tap. We have now sanitized everything the beer will be in contact with. Release the gas pressure, using the safety valve lift, and place the keg lid and o-ring in the bucket of Star-San.
OK, our keg is now sanitized and ready for beer!
Side note: For this next step you will need a second CO2 hose without any fittings on the end. In the photos you will notice the red and blue lines coming from the regulator. The blue line has a fitting to connect with the keg, while the red is an open-ended line.
One more step and we can transfer the beer to the storage keg. Oxygen is harmful beer, so try to minimize exposure of your beer to air. I accomplish this by filling the keg up with CO2 before transferring beer to it (using the red CO2 line). Sanitize the CO2 hose, and place it at the bottom of the keg. Start a gentle flow of CO2 gas. CO2 is heavier than air, so it will fill up the keg like invisble water.
Even though the CO2 is invisible, it's still very easy to tell when your keg is full of CO2 by sniffing gently at the lip of the keg. When it's full of CO2, sniffing it will feel like you just burped a soda through your nose. That's the feeling when CO2 and moisture in your sinus form carbonic acid and cause pain in the sinus. Not pleasant! But you can tell when you have a keg full of CO2.
Now, let's move some beer! Remove the lid from the fermenter. Gently place the fermenter on a surface higher than the keg will be, trying not to stir up sediment. Put your sanitized pump into the fermenter and the other end of the siphon hose into the keg. Give the pump a few strokes and you are transferring beer!
Here's my transferring and kegging arrangement: Fermenter with new beer on the counter-top. Auto siphon pump and tubing transferring beer into the keg. CO2 bottle for purging air from keg in the background, and orange Home Depot bucket with sanitizing solution at the right.

Below: what the inside of a fermenter looks like after a batch has fermented. Non-brewers probably wouldn't drink beer if they knew about this!!! Beer is siphoning out the Auto-siphon tube.

Transferring beer into the keg.

View inside the half-full keg.

Let the process continue until the level in the fermenter is near the bottom. When the level is close to the bottom, very gently tilt the fermenter to get as much liquid as possible without disturbing the sediment. If you want to know why, take a taste the sediment (also known as dregs) afterwards. You won't want to taste it twice :)
After the transfer is complete, take the keg lid and o-ring from the sanitizing solution, install them on the keg, and pressurize the keg with 5-10 psi of CO2. Inspect the lid and both fittings for leaks (soapy water can be very helpful for locating gas leaks).
Next, install the tap and purge any sanitizing solution from it with your new beer. Pour yourself a little and check it out. This will be green beer and it won't taste very good at this point. Beer needs to age for a while for the flavors to settle down. Also, it will probably at this point contain live yeast that will cause you to experience bloating and gas.
Fresh beer. Notice how cloudy it is. The cloudiness is due to live yeast cells, and you will pay the price if you drink them :)

Give your brew 2-4 weeks to settle down and see how it tastes then. Lighter beers tend to need less aging than darker, more complex beers.
Cheers!
First off, sanitation. I mix up a 5 gallon bucket of Star-San (dilute phosphoric acid). Star-San is nice because it won't attack stainless steel, as bleach will. Also, amazingly, it is not necessary to rinse Star-San from your equipment before using it. Heh. Try that with bleach!
Star-San is a weak acid that will kill germs with about 60 seconds of contact time. Since it is a weak acid, and your wort is quite basic, the wort basically neutralizes the traces of Star-San, and poof, it disappears as your wort contacts it! Awesome stuff!
So, I start with a clean keg that has been washed out with with soap and water, and rinsed well. Then I place the siphon and pump into the bucket of Star-San, and get them thoroughly sanitized. After that I pump several ounces of Star-San into the keg. I put the lid on the keg and shake it until I am confident that the solution has soaked the entire interior of the keg.
Next I remove the "gas in" and "liquid out" fittings and soak them in the solution for a minute or two, then re-assemble the keg. Put a little CO2 gas in the keg and flow all of the solution out the tap. We have now sanitized everything the beer will be in contact with. Release the gas pressure, using the safety valve lift, and place the keg lid and o-ring in the bucket of Star-San.
OK, our keg is now sanitized and ready for beer!
Side note: For this next step you will need a second CO2 hose without any fittings on the end. In the photos you will notice the red and blue lines coming from the regulator. The blue line has a fitting to connect with the keg, while the red is an open-ended line.
One more step and we can transfer the beer to the storage keg. Oxygen is harmful beer, so try to minimize exposure of your beer to air. I accomplish this by filling the keg up with CO2 before transferring beer to it (using the red CO2 line). Sanitize the CO2 hose, and place it at the bottom of the keg. Start a gentle flow of CO2 gas. CO2 is heavier than air, so it will fill up the keg like invisble water.
Even though the CO2 is invisible, it's still very easy to tell when your keg is full of CO2 by sniffing gently at the lip of the keg. When it's full of CO2, sniffing it will feel like you just burped a soda through your nose. That's the feeling when CO2 and moisture in your sinus form carbonic acid and cause pain in the sinus. Not pleasant! But you can tell when you have a keg full of CO2.
Now, let's move some beer! Remove the lid from the fermenter. Gently place the fermenter on a surface higher than the keg will be, trying not to stir up sediment. Put your sanitized pump into the fermenter and the other end of the siphon hose into the keg. Give the pump a few strokes and you are transferring beer!
Here's my transferring and kegging arrangement: Fermenter with new beer on the counter-top. Auto siphon pump and tubing transferring beer into the keg. CO2 bottle for purging air from keg in the background, and orange Home Depot bucket with sanitizing solution at the right.

Below: what the inside of a fermenter looks like after a batch has fermented. Non-brewers probably wouldn't drink beer if they knew about this!!! Beer is siphoning out the Auto-siphon tube.

Transferring beer into the keg.

View inside the half-full keg.

Let the process continue until the level in the fermenter is near the bottom. When the level is close to the bottom, very gently tilt the fermenter to get as much liquid as possible without disturbing the sediment. If you want to know why, take a taste the sediment (also known as dregs) afterwards. You won't want to taste it twice :)
After the transfer is complete, take the keg lid and o-ring from the sanitizing solution, install them on the keg, and pressurize the keg with 5-10 psi of CO2. Inspect the lid and both fittings for leaks (soapy water can be very helpful for locating gas leaks).
Next, install the tap and purge any sanitizing solution from it with your new beer. Pour yourself a little and check it out. This will be green beer and it won't taste very good at this point. Beer needs to age for a while for the flavors to settle down. Also, it will probably at this point contain live yeast that will cause you to experience bloating and gas.
Fresh beer. Notice how cloudy it is. The cloudiness is due to live yeast cells, and you will pay the price if you drink them :)

Give your brew 2-4 weeks to settle down and see how it tastes then. Lighter beers tend to need less aging than darker, more complex beers.
Cheers!
Wednesday, February 27, 2013
How to homebrew with an extract kit
I am still pretty much a beginning brewer, so for right now I prefer to use pre-made extract brewing kits. A huge advantage of extract brewing (for me, at least) is the time savings you get over brewing with grains. Making wort from extract takes minutes, while making wort from grains can take hours. On the minus side, the typical grain batch is 10 gallons, while extract is only 5 gallons. Also, extract brewing is more expensive than brewing with grains.
I had a Midwest kit on hand for Amarillo Pale Ale, which uses Amarillo Hops for aroma and flavor, and another type of skunky hop called Columbus, for bittering. I love the taste and smell of Amarillo hops. If I could find a cheap source, I would put them in every batch I make. Heck, I would put it in ice cream.

I haven't mentioned before what ingredients come in these kits. The primary ingredient is malt extract. This is either a dry powder or a concentrated syrup containing sugars and enzymes from malted barley and/or wheat.
The Midwest kits always seem to include some "specialty grains", which are usually roasted malts. These are used to adjust the flavor of the beer.
Hops are also included. These hops will be used for bittering, flavor, and aroma.
The kits also include a small bag for steeping the specialty grains, priming sugar to carbonate your bottled beer, and yeast to ferment the mixture (convert the sugars into alcohol).
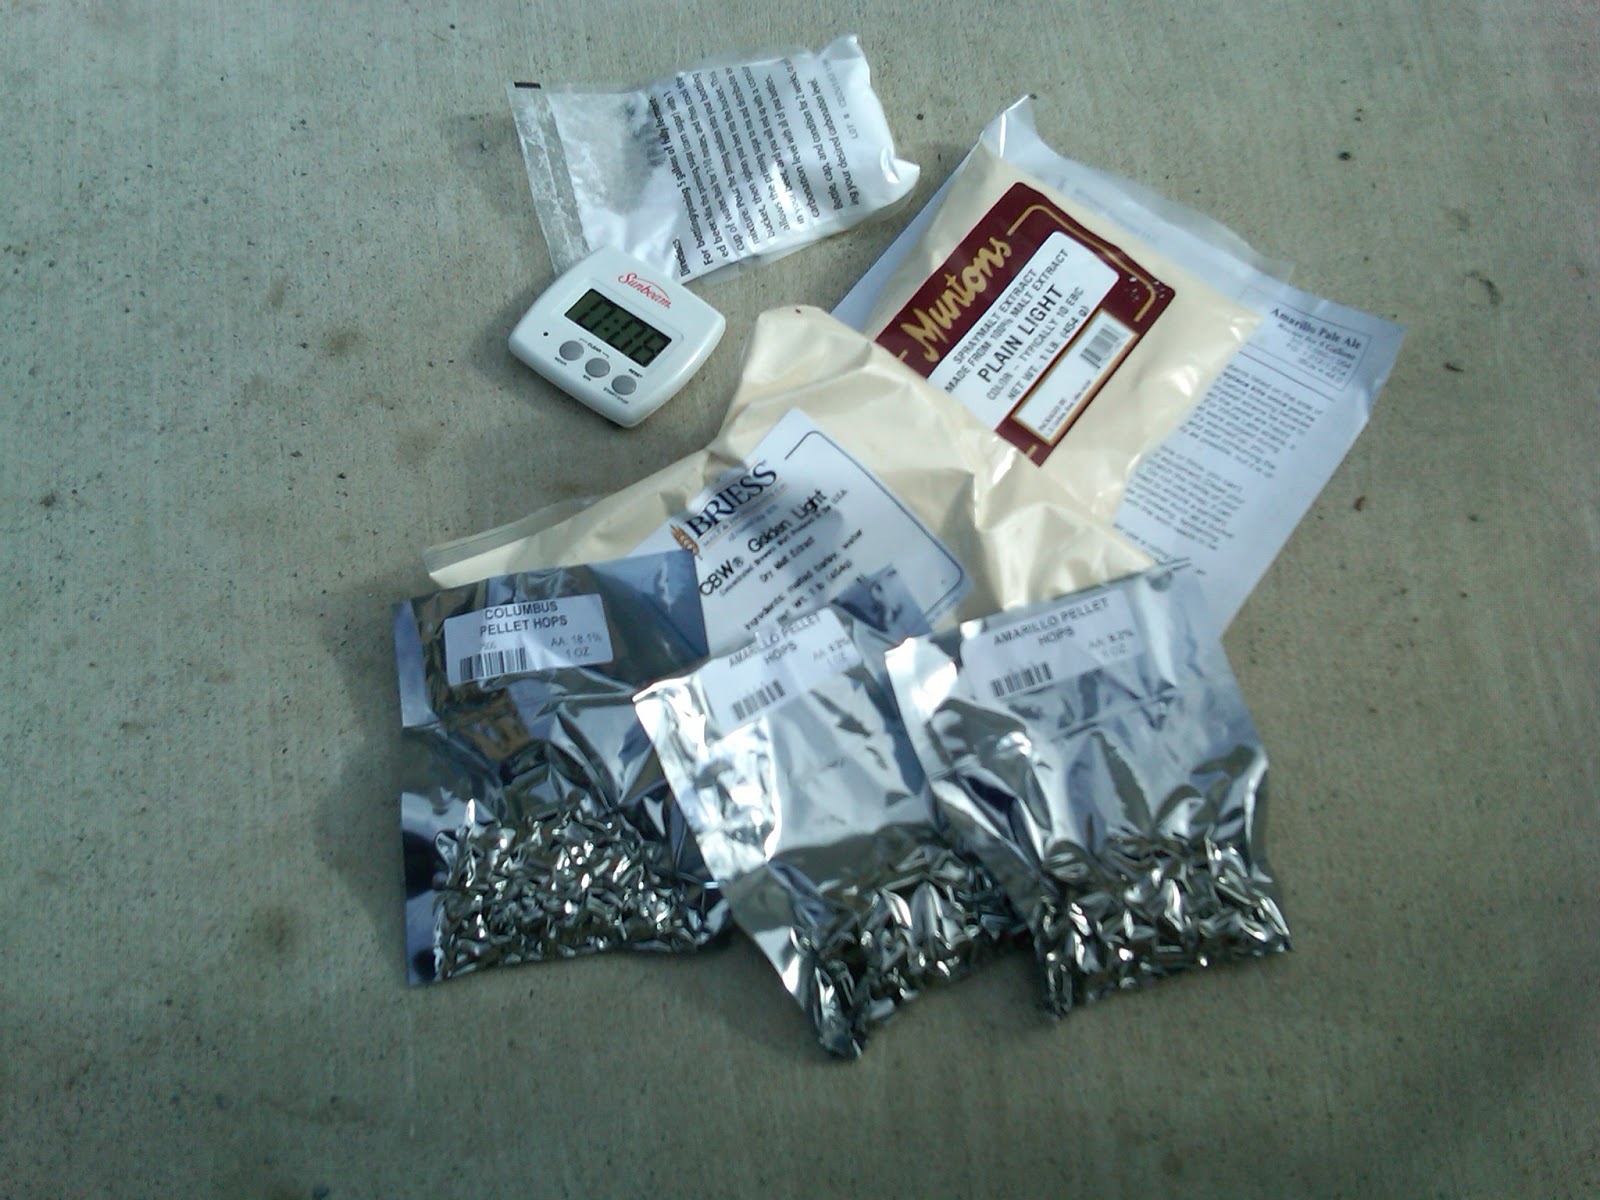
Here are a few of the ingredients for this particular kit that I had near the boil pot: Priming sugar at the top of the photo, a digital timer (mine), two 1lb bags of dry malt extract, and 3 small bags of pellet hops.

The steps to brew are pretty straightforward:
Take your yeast out of the refrigerator and allow it to begin warming to room temperature. Shake it up a bit to ensure the yeast are all exposed to the nutrients.

Next, to make 5 gallons of beer, start out with 6 gallons of water. You will be boiling the mixture for an hour, and one gallon will steam off during that hour.
I like to get my water from the hot water tap in the house because it's already at 130 degrees. This saves both time and propane. I have a deep sink to fill my pot, but would use a pitcher at the kitchen sink if that weren't available. Try to use good-tasting water if you want good-tasting beer.
Here is a picture of my brewing rig:
Bring the 6 gallons up to 155 degrees and hold the temperature there. You put the specialty grains in the muslin bag and allow the grains to steep in the water for 15-30 minutes. Pull the bag containing the grains out, and squeeze the juice out of it. Playtex gloves are nice for this step, because 155 degrees is unpleasantly hot on bare fingers. Trust me on this!
Here we are in the process of steeping the specialty grains. I am using a paper binder to keep the steeping bag from falling all the way in.

After the specialty grains are out (I feed them to the deer afterwards), you turn off the burner. TURN OFF THE BURNER! Here's why: Liquid malt extract has the consistency of rubber cement. It doesn't want to pour. Because of this, it tends to drop to the bottom of the pot and stick there. If the fire were on, you would scorch the extract at the bottom of the pot and ruin your beer before you even got it made. So shut off the heat and give the hot water plenty of time to dissolve this gooey stuff. Stir it with a long spoon until you are sure it's dissolved. Then stir some more.
Here's what to do with the Liquid Malt Extract to improve the dissolving process. I put it in a water bath and pre-warm it on the stove while steeping the specialty grains. This helps thin the stuff from rubber cement to more of a syrup consistency.

This should give you an example of the consistency of liquid extract at room temperature:

I prefer the dry malt extract for a couple of reasons. First, since it's not watered down, pound for pound, your beer will be stronger. And second, unlike the liquid extract, it floats. It doesn't sink to the bottom and try to burn itself up on the bottom of your pot.
Now that we have dissolved the malt extract in hot water, we have the basis for beer! When you dissolve malt extract in water, you have made the Wort (pronounced "Wert"). But we aren't done yet. You could perhaps make beer from this, but it would be sweeter than pepsi. Worse, it might become a bacterial science experiment. So let's boil the wort, shall we?
Light your burner and bring the wort slowly up to a boil. Slowly, because you can also scorch the sugary wort on the bottom of your boiling pot. Slowly for another reason too. Our wort is full of sugars, starches, and proteins, so the bubbles like to foam up and over. A boilover of this stuff is messy! You have to watch it like a hawk and be ready to cut the gas off. Shortly before it begins to boil is when the "protein break" happens and a boilover is likely. Afterwards the danger is over. Just get it back to a rolling boil.
Once it comes to a boil, we set a 60 minute timer, and add bittering hops. The hops you add will be either pellets or leaves. This kit comes with pellets. You can drop them loose in the wort, but I prefer to put them in the steeping bag. I clean out the steeping bag of the specialty grains and re-use it for the hops. You don't want all that plant material in your fermenter. It will make your beer have a grassy taste.
We now have our wort boiling and killing any germs in the mixture. The boiling is also releasing oils from the hops, which over an hour will bitter the beer, countering the sickeningly sweet mixture with some bitterness. At about 15 minutes before flame-out, I place the wort chiller in the boiling wort to sterilize it.
Depending on the beer, most recipes will call for other hop additions. These can occur anywhere in the boil, but mid-boil hops are for flavor/bittering, and toward the end are more for the "nose" or aroma of the beer, and not for bittering.
Assuming all the hop additions were done properly (at the correct time and correct amount), we are ready to shut off the fire and cool our wort down and let the yeast begin working their magic!
I use an immersion wort chiller to quickly bring the wort down to a temperature where yeast cells can survive. You can do it with an ice bath, but it takes longer and increases the chance of an infection. After about 5 minutes of chilling with the wort chiller, the wort is down below 80 degrees, at which point the yeast cells can survive.
Hopefully by this time your dormant yeast will have warmed up, your sterile wort will have cooled down, so the yeast won't have to deal with a big temperature shock.
There is one thing you need to do before adding the yeast, however. When you boil water, you de-aerate it, driving off all the oxygen. Yeast need oxygen to get started, so you need to aerate the wort. Some folks slosh the wort around vigorously, while others pour it back and forth between containers. I'm lazy and worried about infection, so I use an air compressor and a sanitized tube to blow bubbles from the bottom of the wort for about 30 seconds.
Next we pour the wort into a sanitized fermenter. The fermenter is a sealed container that keeps the wort and yeast in, releases gas the yeast generate, and keeps the germs out.
Then we pitch the yeast. That's what it's called: "Pitching the yeast". It means we are adding yeast to our wort. Then we place an airlock on top of the container, filled with sanitizing solution. The airlock will allow the container to breathe, while killing any germs that might try to get to our beer.
 After a day or so the yeast will have adapted to their new environment and start devouring all that sugar and releasing alcohol. At that point so much gas will be generated that the airlock will be bubbling continuously and it will smell like beer. After a couple of weeks, the yeast will pretty much be done, and all we have to do is bottle it!
Here is a picture of fermentation at the beginning of the process. This is two days after brew day when the yeast was pitched. The layer of goop on top of the wort is called krausen.

If the yeast is very vigorous, or you don't have enough head space in your fermenter, this stuff can expand, plug your airlock, and blow out of the fermenter. That HAS to be nasty to clean up, as well as potentially infecting your beer with bacteria. Here is a picture I found on the internet of such an event. I know the wife would be most unhappy about a mess like this!

Back to less eventful brewing... I used a hot pad to warm the wort and help get the yeast active. The note on the fermenter is to remind me when I brewed and what kind of beer is fermenting. I have 3 different batches going right now, and don't want any confusion.

I don't actually bottle my beer, once again because I am lazy, and don't feel like washing and sanitizing 55 botttles every time I brew a batch. Instead I wash and sanitize ONE cornelius keg (AKA corny keg).
Another advantage of keg storage is that you don't have to boil and then add priming sugar to your beer prior to bottling. Priming sugar is used to give the yeast something new to eat and allow them to make CO2 gas, to carbonate beer in the botttle. With a keg, you carbonate your beer with a gas cylinder and regulator. I don't waste the priming sugar however. I add it to the wort to make the beer stronger! For a detailed post on how to transfer and store your brew in a cornelius keg, click here.

And here is what all that trouble is for: Something the big breweries will never make - beer with flavor, character, and potency!

I had a Midwest kit on hand for Amarillo Pale Ale, which uses Amarillo Hops for aroma and flavor, and another type of skunky hop called Columbus, for bittering. I love the taste and smell of Amarillo hops. If I could find a cheap source, I would put them in every batch I make. Heck, I would put it in ice cream.

I haven't mentioned before what ingredients come in these kits. The primary ingredient is malt extract. This is either a dry powder or a concentrated syrup containing sugars and enzymes from malted barley and/or wheat.
The Midwest kits always seem to include some "specialty grains", which are usually roasted malts. These are used to adjust the flavor of the beer.
Hops are also included. These hops will be used for bittering, flavor, and aroma.
The kits also include a small bag for steeping the specialty grains, priming sugar to carbonate your bottled beer, and yeast to ferment the mixture (convert the sugars into alcohol).
Here are a few of the ingredients for this particular kit that I had near the boil pot: Priming sugar at the top of the photo, a digital timer (mine), two 1lb bags of dry malt extract, and 3 small bags of pellet hops.
The steps to brew are pretty straightforward:
Take your yeast out of the refrigerator and allow it to begin warming to room temperature. Shake it up a bit to ensure the yeast are all exposed to the nutrients.

Next, to make 5 gallons of beer, start out with 6 gallons of water. You will be boiling the mixture for an hour, and one gallon will steam off during that hour.
I like to get my water from the hot water tap in the house because it's already at 130 degrees. This saves both time and propane. I have a deep sink to fill my pot, but would use a pitcher at the kitchen sink if that weren't available. Try to use good-tasting water if you want good-tasting beer.
Here is a picture of my brewing rig:
- Chair to chill out and have a cold one while making more cold ones.
- Turkey cooker burner and lighter
- Brew-pot
- Long-handled stirring spoon and thermometer inside the brew-pot
- Propane tank
- Immersion wort chiller
- Brew kit and some ingredients between the chair and burner


Bring the 6 gallons up to 155 degrees and hold the temperature there. You put the specialty grains in the muslin bag and allow the grains to steep in the water for 15-30 minutes. Pull the bag containing the grains out, and squeeze the juice out of it. Playtex gloves are nice for this step, because 155 degrees is unpleasantly hot on bare fingers. Trust me on this!
Here we are in the process of steeping the specialty grains. I am using a paper binder to keep the steeping bag from falling all the way in.

After the specialty grains are out (I feed them to the deer afterwards), you turn off the burner. TURN OFF THE BURNER! Here's why: Liquid malt extract has the consistency of rubber cement. It doesn't want to pour. Because of this, it tends to drop to the bottom of the pot and stick there. If the fire were on, you would scorch the extract at the bottom of the pot and ruin your beer before you even got it made. So shut off the heat and give the hot water plenty of time to dissolve this gooey stuff. Stir it with a long spoon until you are sure it's dissolved. Then stir some more.
Here's what to do with the Liquid Malt Extract to improve the dissolving process. I put it in a water bath and pre-warm it on the stove while steeping the specialty grains. This helps thin the stuff from rubber cement to more of a syrup consistency.

This should give you an example of the consistency of liquid extract at room temperature:

I prefer the dry malt extract for a couple of reasons. First, since it's not watered down, pound for pound, your beer will be stronger. And second, unlike the liquid extract, it floats. It doesn't sink to the bottom and try to burn itself up on the bottom of your pot.
Now that we have dissolved the malt extract in hot water, we have the basis for beer! When you dissolve malt extract in water, you have made the Wort (pronounced "Wert"). But we aren't done yet. You could perhaps make beer from this, but it would be sweeter than pepsi. Worse, it might become a bacterial science experiment. So let's boil the wort, shall we?
Light your burner and bring the wort slowly up to a boil. Slowly, because you can also scorch the sugary wort on the bottom of your boiling pot. Slowly for another reason too. Our wort is full of sugars, starches, and proteins, so the bubbles like to foam up and over. A boilover of this stuff is messy! You have to watch it like a hawk and be ready to cut the gas off. Shortly before it begins to boil is when the "protein break" happens and a boilover is likely. Afterwards the danger is over. Just get it back to a rolling boil.
Once it comes to a boil, we set a 60 minute timer, and add bittering hops. The hops you add will be either pellets or leaves. This kit comes with pellets. You can drop them loose in the wort, but I prefer to put them in the steeping bag. I clean out the steeping bag of the specialty grains and re-use it for the hops. You don't want all that plant material in your fermenter. It will make your beer have a grassy taste.
We now have our wort boiling and killing any germs in the mixture. The boiling is also releasing oils from the hops, which over an hour will bitter the beer, countering the sickeningly sweet mixture with some bitterness. At about 15 minutes before flame-out, I place the wort chiller in the boiling wort to sterilize it.
Depending on the beer, most recipes will call for other hop additions. These can occur anywhere in the boil, but mid-boil hops are for flavor/bittering, and toward the end are more for the "nose" or aroma of the beer, and not for bittering.
Assuming all the hop additions were done properly (at the correct time and correct amount), we are ready to shut off the fire and cool our wort down and let the yeast begin working their magic!
I use an immersion wort chiller to quickly bring the wort down to a temperature where yeast cells can survive. You can do it with an ice bath, but it takes longer and increases the chance of an infection. After about 5 minutes of chilling with the wort chiller, the wort is down below 80 degrees, at which point the yeast cells can survive.
Hopefully by this time your dormant yeast will have warmed up, your sterile wort will have cooled down, so the yeast won't have to deal with a big temperature shock.
There is one thing you need to do before adding the yeast, however. When you boil water, you de-aerate it, driving off all the oxygen. Yeast need oxygen to get started, so you need to aerate the wort. Some folks slosh the wort around vigorously, while others pour it back and forth between containers. I'm lazy and worried about infection, so I use an air compressor and a sanitized tube to blow bubbles from the bottom of the wort for about 30 seconds.
Next we pour the wort into a sanitized fermenter. The fermenter is a sealed container that keeps the wort and yeast in, releases gas the yeast generate, and keeps the germs out.
Then we pitch the yeast. That's what it's called: "Pitching the yeast". It means we are adding yeast to our wort. Then we place an airlock on top of the container, filled with sanitizing solution. The airlock will allow the container to breathe, while killing any germs that might try to get to our beer.

Here is a picture of fermentation at the beginning of the process. This is two days after brew day when the yeast was pitched. The layer of goop on top of the wort is called krausen.

If the yeast is very vigorous, or you don't have enough head space in your fermenter, this stuff can expand, plug your airlock, and blow out of the fermenter. That HAS to be nasty to clean up, as well as potentially infecting your beer with bacteria. Here is a picture I found on the internet of such an event. I know the wife would be most unhappy about a mess like this!

Back to less eventful brewing... I used a hot pad to warm the wort and help get the yeast active. The note on the fermenter is to remind me when I brewed and what kind of beer is fermenting. I have 3 different batches going right now, and don't want any confusion.

I don't actually bottle my beer, once again because I am lazy, and don't feel like washing and sanitizing 55 botttles every time I brew a batch. Instead I wash and sanitize ONE cornelius keg (AKA corny keg).
Another advantage of keg storage is that you don't have to boil and then add priming sugar to your beer prior to bottling. Priming sugar is used to give the yeast something new to eat and allow them to make CO2 gas, to carbonate beer in the botttle. With a keg, you carbonate your beer with a gas cylinder and regulator. I don't waste the priming sugar however. I add it to the wort to make the beer stronger! For a detailed post on how to transfer and store your brew in a cornelius keg, click here.

And here is what all that trouble is for: Something the big breweries will never make - beer with flavor, character, and potency!

Monday, February 18, 2013
Homebrews #4 and #5
OK so it wasn't ALL work this days off. We had one single day where the weather was warm-ish and not windy, so I chose to brew up a couple of batches of beer.
I prefer to brew two 5 gallon batches back-to-back, because home-brew setup and breakdown both take me a fair amount of time. Someday I will have a proper setup with a rolling cabinet, but that is not the case right now. I have to haul each piece from storage to where I am brewing. In this case, I needed to be near the garden hose. Eventually I moved to a spot in the sun so I could keep warm :)
This first bach is called Cologne Kolsch. The wife likes Alaska Brewery Summer Ale, so I am giving this a shot.

Below is the second batch, a Christmas gift I received, which is a Belgian Honey Wheat. It comes with orange peel and coriander flavorings, and should taste similar to a Blue Moon, but with about twice the kick.
Here the grains are steeping for 30 minutes before bringing it to a boil. The copper coil in the background is the wort chiller, which quickly brings the temperature down after the boil. This allows you to quickly get the temperature down to where yeast can survive and then get it sealed up before airborne germs can infect the beer.
I prefer to brew two 5 gallon batches back-to-back, because home-brew setup and breakdown both take me a fair amount of time. Someday I will have a proper setup with a rolling cabinet, but that is not the case right now. I have to haul each piece from storage to where I am brewing. In this case, I needed to be near the garden hose. Eventually I moved to a spot in the sun so I could keep warm :)
This first bach is called Cologne Kolsch. The wife likes Alaska Brewery Summer Ale, so I am giving this a shot.

Below is the second batch, a Christmas gift I received, which is a Belgian Honey Wheat. It comes with orange peel and coriander flavorings, and should taste similar to a Blue Moon, but with about twice the kick.
Here the grains are steeping for 30 minutes before bringing it to a boil. The copper coil in the background is the wort chiller, which quickly brings the temperature down after the boil. This allows you to quickly get the temperature down to where yeast can survive and then get it sealed up before airborne germs can infect the beer.

Subscribe to:
Posts (Atom)