I was viewing Craigslist the other day, and saw a second beautiful old Zenith console tube radio for sale for $60. I couldn't convince myself to pass it up.
I'm not going to lie; this one is going to be a challenge - starting with getting it home. The truck has a minor issue right now, so we took the wife's SUV. It was a tight fit.
The other challenge is that this radio will need a lot more TLC than the first one. The chassis was not attached to the cabinet, and when I put the radio in the back of the car, it tried to fall out the back, but it was hanging by wires. Sad stuff. Fortunately we got it home with no more damage than it had to begin with. We shoved a bunch of cloth up under the chassis so it would be supported instead of breaking the wires under its own weight.
I was able to find a schematic for this radio, and as time permits, I'll begin replacing frayed wires and old capacitors. Also the wiring will need to be verified to ensure that it's going where it should. Someone has been in this thing.
Behold! A 1940 vintage Zenith, Model 10-S-464. The "10" in the model number is how many vacuum tubes the radio uses.
Below: The six white buttons on the left are tone control buttons, while the six on the right are radio station preselect switches. The buttons are interesting in that you PULL them to make them work instead of pushing on them. The inner silvery shaft is the on/off/volume, the smaller brass shaft is the tuner, and the large brass shaft selects the radio band (AM, medium wave or short wave radio). The green tuning eye tube is at the top of the dial. As you can see, it's missing the knobs for volume and tuning.
What I hope to see on this radio at some point:
It might get interesting trying to locate the knobs that need to be replaced. The white plastic ones, they make reproductions of for $10. The lever, that's another story.
Below: The two new radios together. The 10-S-464 on the right is larger and grander than the 6-S-52, and it has a more powerful Art Deco vibe - more rounded edges and fewer straight lines. The grille on the older left radio looks a bit gothic, although it also has a lot of Art Deco influence.
Below, the chassis for the bigger radio. Again, this was never bolted in place.
The speaker doesn't have any tears or holes, so that's good news. Everything is quite dirty, of course.
At the very bottom of the back of the cabinet was this: A "Wavemagnet" antenna. And a busted strut. The wavemagnet is just a loop antenna in a cardboard box that can be rotated on its axis. "WaveMagnet - Pulling in radio waves like a magnet - get it???
I think I'll start right here with the repair process.
When I find time to get this thing restored, it will look something like this:
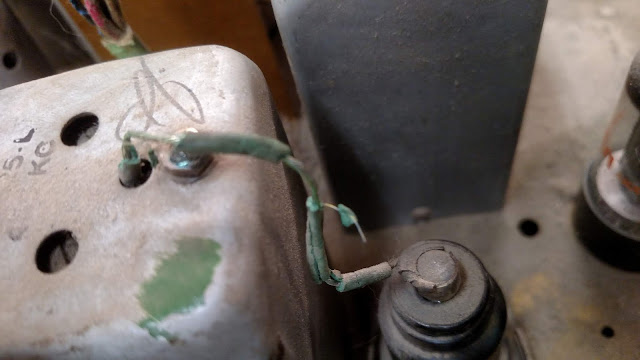
This one is going to need a real investment of time though. And money. But mostly time. Below, the tuning eye tube socket has come loose from the pins. The insulation has come off the wires. This is why you NEVER attempt to plug one of these things in without going through it first. All these wires will need to be replaced.
I stuffed the base up against the tube, to see if there was some sort of issue. The bracket that holds the eye tube is at the top center in the picture below.
Below: A lead coming from one of the IF transformers is missing insulation. This is going to be quite the project if I have to take many components apart to repair them.
Below, front view of the chassis. I'm not certain how the knob on the right gets turned. It's the band selector, but there is no hole in the cabinet to turn this one!
Edit: Below: Found this on Ebay - for $75. This is how the switch on the right gets turned. Also there is a lever that attaches to the shaft.
Below: Underneath the chassis. A few things to notice here. First up, that huge silver flywheel. When you give the tuner a spin, it has heft. It feels like you are spinning a turnstyle. It keeps going for a bit. The smaller wheel actually rotates the tuner. Someone had placed a rubber band between the spindle and the small wheel. Bits of it were stuck on the wheel. There are a pair of what look like "C" cell batteries duct-taped together. So someone was in here at some point to replace the big power supply capacitors. The rest looks good. I wonder where I can find a similar spring for the top right mounting bracket?
Below: Definitely NOT Zenith workmanship.
Below, bits of dried-up rubber band on the tuning knob pulley. I think I can find a suitable replacement made from modern materials instead of natural rubber.
Wavemagnet antenna lower mounting bracket.
Below, a dusty, cobweb covered wavemagnet loop antenna, just waiting for a place to be installed.


No comments:
Post a Comment