The fairing was mounted by using brackets that went in the holes that remained when you removed the front turn signals from the headlight housing. I removed the turn signals, but even then I had enough sense to save them for later.
I also saved the rubber triple intake manifold and air filter housing when I put individual filters on each carburetor. It's just a good idea to keep the stuff you take off your bike. The center stand is an exception, because I am not going back to the stock exhaust pipes. That's a total of 40lbs of non performance weight that I will never miss.
When you look at this pic, notice the front turn signals are missing from the headlight. The bolts previously held brackets to mount that cheesy fairing.
Here's what it looks like now. They are installed, but one has a missing lens, and the other lens is rashed.
Lens covers are easy to get. In fact entire turn signal assemblies are easy to get and inexpensive. The entire Kawasaki street bike line used these throughout the late 1970's so they made a lot of them. One of the vendors sells the entire set (with stems) for just $120.
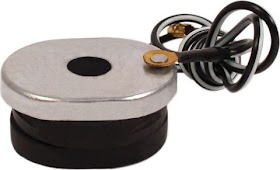
I'm missing one item from inside the headlight housing, and that is the ground connector for one of the turn signals. The turn signal stem passes through a rubber grommet and bolts inside the headlight housing. Due to the rubber grommet, it doesn't have a good ground connection for the light to work. A metal collar with a black and yellow wire connects the stem to ground via the bike's electrical system.
This side lacks the collar. Fortunately they are available. I should buy four, just for the new rubber grommets...
So much for the turn signals... nothing money can't fix.
The battery is toast, of course. This is the one I installed in 1992. I'm not very fond of lead-acid batteries on this bike. Before I owned it, the vent line on the battery had come off, doing quite a bit of cosmetic damage. The chrome on the exhaust pipes and chain guard was eaten off, the battery box was rusted, and it took paint off the frame. Additionally the chain guard cracked where the acid had attacked it.
I think the replacement will be a Lithium-Ion battery, with better specs, less weight, and no acid to mess up the bike.
Look at the corrosion in the battery box. Nasty. I will have to remove it, strip it, and repaint.
Here's where the battery acid ate the chrome off the chain guard and surface corroded the frame (repainted without sanding.
Lithium Ion sounds better and better!
When I pulled the alternator/distributor cover off, there was a white haze of corrosion on the top parts of the interior. It's weird. You would think if there were a water leak, the water would pool at the bottom and corrode things there. There is no corrosion near the bottom. This junk was on there when I last had the bike running, so I'm not too worried about it. I will clean things up this time though. I just have to leave the ignition settings alone.
UPDATE: Cleaned up. I took each screw, brush holder, and wire clip over to the wire wheel, then hit the timing adjustment plate with a brass toothbrush. Looks better.
As I was taking things apart, I noticed one of the labels was peeling off. This was the label explaining what type and length of chain the bike requires. It probably would not last much longer.
Fortunately my wife had this cool stuff on hand. Clean the surfaces, spray it on, wait 3-5 minutes for the stuff to get tacky, then stick your thing back on.
That should stay put. At least it won't fall off right away :)


No comments:
Post a Comment